


Protect your site from the possibility of invasion of it by unauthorized persons, including ill-wishers - the natural desire of every owner of a country house or villa. But, apart from reliable protection, fences, wickets and gates should provide the most comfortable use for owners. One of such rather convenient elements of fencing can be considered automatic sliding gates for cottages, especially since there are professional firms such as "Arc-Technician", which quickly and professionally help to solve the issue of installing automatic gates. You can try to make such a gate yourself, our article will help you with useful information.
Content
- 1 Sliding gate design
- 2 How to choose the material for the sliding gate
- 3 We compose the project
- 4 We construct an automatic gate with our own hands
- 5 How to Reinforce
- 6 Installation of poles
- 7 How to fix the main elements
- 8 Sheathing and installation of the section
- 9 How to install a section
- 10 How to install automation for sliding gates
Sliding gate design
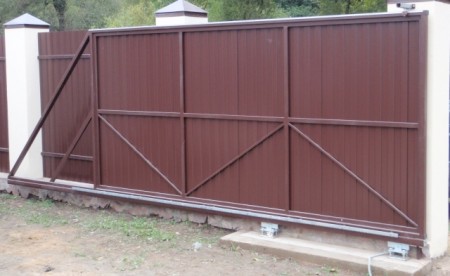
Automatic gates today can hardly be attributed to luxury items, they have long become a familiar piece of fencing around a private house, emphasizing the fact of living in a practical and modern dacha. There are no restrictions on the installation of automatic gates, they can be combined with concrete, brick, metal and even the most common wooden fence. If the funds allow, then this design can be ordered from professionals, if there is a desire to save money and experience their abilities in construction, then it is realistic to make a sliding gate with your own hands.
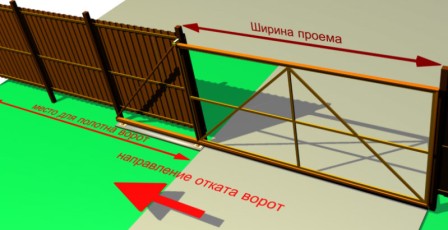
Sliding, or sliding, gates are designed to gain access (or its restriction) to the territory of a suburban area, without occupying useful space with very large doors. When the gate is opened, the movable part moves along the fence, the area it takes is minimal. Calculate the area can be preliminarily, by multiplying the length of the moving section by the width of the gate and the mechanism of their movement.
There are two types of sliding gates:
- traditional - mechanical
- automatic, equipped with a special drive, equipped with photocells and a radio receiver, the movement of sections in such models occurs along the guide rail.
Installation of automatic sliding gates is worth a lot, but if there is a desire, then having spent quite acceptable means, you can build such a gate yourself.
How to choose the material for the sliding gate
The main requirement for the gates is to ensure reliable protection of the territory, therefore the material for them should be chosen according to the one from which the fence around the site is made, wood, metal can be used, but the weight of the future design must be paid attention - too heavy loads on the leading blocks are undesirable.
We compose the project
The success of any, even the smallest construction, requires the drawing up of a project or at least a detailed scheme indicating the size and technical characteristics of the components. This is usually tied to the cost estimate, it is not difficult to calculate it yourself.
The simplest design of a summer gate construction may not include an electric motor or a drive. You can use ready-made schemes, there are many standard options, among them it will be easy to choose the right one.
We construct an automatic gate with our own hands

Since many owners of suburban areas prefer automatic models of sliding gates, it will be necessary to consider the principle of installing an electric drive, with which the automatic movement of the section will be carried out at the entrance and exit of the car.
The material for the door section should be chosen with weight in mind, than the section will be lighter:
- the less effort you will have to apply to move it
- the fewer failures will occur during the operation of the gate
- at construction it is not necessary to design powerful blocks and a channel for its movement
- the less power the drive needs to be installed.
It is easy to conclude that reducing the weight of the section will result in a significant cost savings. Not bad in terms of reliability and optimal in terms of price will be the option of using a metal structure with polycarbonate lined.
Having solved all organizational issues, you can proceed directly to the manufacture of the gate.
How to Reinforce

The installation of the base of the gate is performed on the previously poured concrete pillars (the depth of the concrete pouring is 1.5 m). If the planned width of the gate is 4 m, then the length of the section should be equal to 6 m, the width of the road gap - not less than 75 mm. To give the gates more stability, the base is reinforced by immersing the vertical part of the structure by the above 1.5 m, while the guide part and the channel remain at the top. Such an option of reinforcing the pillars implies giving them a sufficient level of stability and reliability. To fix the main section of the gate, special catchers are installed. They will warn the sagging gate under the influence of their own weight.
Installation of poles
The installation of the main facade elements of the fence is planned at such a distance from each other so that the further installation of the gates is automatic and their operation does not cause any particular problems. Posts can be laid out of brick or poured from concrete, there is also the option of using large diameter pipes.
How to fix the main elements

On the constructed base and poles, the fastening section is fixed. First, a channel is installed on the prepared foundation of the base, a trolley with rollers and a fixing clamp with rollers are mounted on the pole - the section will move through them. On the opposite side of the door opening, the end roller and the catcher of the section are installed.

Depending on the chosen scheme, a choice of mechanisms and components is made, a mobile section is prepared. To install an automatic gate, you need a metal section. Its frame is welded according to the previously calculated dimensions. From their strict observance, in the final analysis, the correctness of the operation of the mechanism and the quality of the entire structure depend.
Sheathing and installation of the section

To ensure that the section of the gate has an attractive appearance it can be sewn with light and practical material:
- inexpensive sheet metal
- stainless steel sheet
- profiled sheeting
- polycarbonate.
In the choice of material should be guided by the parameters of the gate and their wishes for their characteristics. The selected material is fixed using self-tapping screws, bolts or welding.
How to install a section

At the final stage, the mobile section is assembled into the assembled structure. To do this, the fixing brackets are removed, the finished section is installed in the guide rail (channel), fixed in the construction by fixing brackets. There are no special difficulties in performing these operations.
How to install automation for sliding gates

The first step is to install the mounting base, usually it is included in the kit supplied with the electric drive for sliding gates. Installing the drive with the base near the gate determine the location of the rack. If it is necessary to lift the drive, the mounting base is installed on profiled pipes welded to the channel. A mounting base is attached to the pipes by welding, to it - a drive for opening the gate. Wires should be threaded through a special hole.

After installing the rack, limit switches are installed, magnetic and mechanical, the latter should not strongly break the spring. Installation of the warning light and photocells is carried out at the request of the owner, these elements are not mandatory. If the photocells are installed, they will be installed after the limit switches are set.
Those who will perform the connection for the first time experts recommend doing the work carefully, in case if the automation does not start - to find a mistake on their own will not be easy. Therefore, when making a connection, you should perform all operations in the following order:
- first connect the engine with rack
- further - limit switches
- then check the jumpers on the control board (they are different for each model)
- after power up, program the remote controls
- adjust the limit switches, adjust the time and effort
- make connection of peripheral devices: lamps and photocells.
With this order of execution, it will be easier to track the operation performed with an error. If there is no experience of connecting automation, then it is best to initially perform the connection by expanding all the components of the system on the desktop, only then transfer everything to the place of the real installation. The gate control button can be installed in any convenient location (garage, yard).
When adjusting the limit switches, do not put them in such a position that when closing the door is pressed into the catchers, and when opening, the end roller strikes - in that case the drive will be subjected to an excessive impact load. Providently left a couple of centimeters gap will significantly extend the life of the system.
So in general terms, the rules for installing automation for sliding gates. A more detailed description of the order of work is available in the instructions provided to each individual model of the drive device.


