The number of energy-consuming appliances in our homes has increased many-fold, and with it the amount of electricity consumed has increased significantly, and all this load is borne by electric wiring laid in our house.
Content
- 1 Replacement of electrical wiring in the house, reasons for replacement
- 2 Step-by-step work on the replacement of electrical wiring
- 2.1 power circuit design
- 2.2 choice of materials
- 2.3 calculation of the cable section and power equipment
- 2.4 color-coded insulation of electrical wires
- 2.5 marking of electric wiring elements
- 2.6 wiring installation
- 2.7 features wiring harness in a wooden house
- 2.8 wire connection options
- 2.9 switchboard equipment
Replacement of electrical wiring in the house, reasons for replacement
In our country, a huge number of residential buildings, which are not one decade, and the wiring in them has never changed since the construction. At best, this can lead to a power failure, and at worst a fire due to the heating of the conductors due to a short circuit or spark in the place of poor contact.
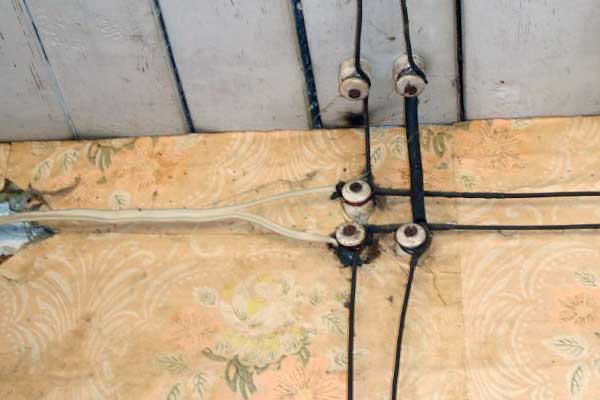
Long-term operation of wires leads to loss of insulation of its dielectric properties, it becomes rigid, cracked and breaks when bending the wire. In addition, in Soviet times in the residential sector, electrical wiring was performed exclusively by aluminum wire, which was due to its low price. Over the years it became clear that for these jobs aluminum is not the most suitable material. The oxide film on the surface of aluminum protects the metal from corrosion, but its conductivity is much worse than that of pure metal, so at the junction of the wires, due to insufficient contact, heating and then melting of the wires can occur, if overheated, aluminum becomes brittle and breaks. All this leads to a breakdown of the electrical circuit or short circuit, which affects the reliability of power supply at home. That is why at the present time, when electrical wiring in residential buildings is equipped, they refused to use aluminum wires in favor of copper, as required by the rules for the installation of electrical installations.
The copper wire has a lower electrical resistivity, δ aboutstrength and resistance to fracture, but there are also significant disadvantages: high cost and high weight. If the weight of the wire can still be tolerated, then for people with limited financial resources, the main criterion for choosing a material is price, and therefore they are forced to choose aluminum. On the other hand, high-quality wiring with aluminum wire will serve faithfully for more than a dozen years. The work on replacing electrical wiring in private homes is practically no different from similar works in apartments, except that there are no neighbors who will be disturbed by the inevitable noise.
There are several reasons for replacing the electrical wiring, the main ones are its wear and the insufficient load capacity of the wires. Most often the replacement of electrical wiring is timed for repair, as it entails the performance of a significant amount of finishing work. It is recommended to perform a complete replacement of wiring and electrical fittings, since usually there are unknown in the house or apartment the routes of the wiring and the location of the junction boxes, the condition and integrity of the laid wires, and the sockets have burnt contacts. If the place of passage can be determined using instruments, the condition and integrity of the wires, the quality of the connections under the plaster layer can not be seen. Subsequently, all this can lead to emergencies. A complete replacement of the electrical wiring makes it possible to fulfill it in full accordance with the needs of the owner of the house in terms of load capacity, the number and location of outlets, switches and lamps, protection from electric shock.
There are various options for replacing electrical wiring in a private house. The easiest way is to perform the installation simultaneously in the entire private house or apartment, however, if financial possibilities are not allowed or it is simply impossible to vacate all premises, a step-by-step execution of the work in each of the rooms can be a way out. Thus, by alternate gradual replacement of the wiring, a complete replacement is carried out in the entire apartment or house. This will allow you to invest more evenly, but stretches the repair for a long time and creates additional difficulties and inconveniences for electricians and persons occupying the renovated premises.
Applied quality tools are real helpers, and high-quality consumables and devices, exact adherence to rules - the guarantee of reliable electrical wiring in your home.
Step-by-step work on the replacement of electrical wiring
power circuit design
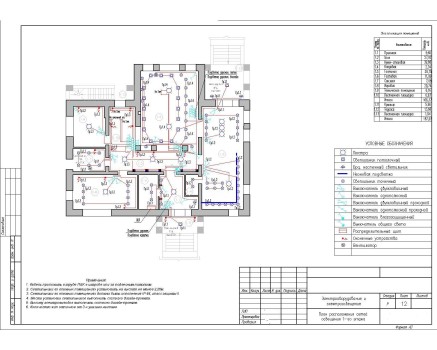
Preparatory work for the replacement of electrical wiring in the house should begin with the drawing up of a scheme, for which it is necessary to carefully consider the locations of outlets, switches, lamps, junction boxes. The design of the circuit will allow to calculate the power consumption for all the beams, select the required cross-section of the wires and, if possible, distribute the load evenly. Posting is done not for one year and in the case of miscalculation, then it will be hard to change something.
The number of outlets should be selected with a small margin, since it is not known what new home appliances can appear in the foreseeable future. If the house has a long corridor, it makes sense to provide light control through the passage switches from different ends of the room or install presence sensors.
Ideally, each outlet should be connected with a separate wire to the junction box and protected with a separate circuit breaker. This increases the reliability of the network, but in this case, the consumption of materials increases manifold.
If you connect all the sockets in parallel to the box with a single wire, then the electrical wires are significantly saved, but the reliability of the entire system drastically decreases. In addition, over time, the screw connections on the sockets that the wire is screwed on loosen, and because of the sparks, the contacts of the sockets burn out, the more the socket is placed closer to the junction box. You can increase the reliability if the wire when connecting to the sockets will not be cut, but wound up, for example, a loop, which is somewhat more difficult to implement. This applies to a greater degree to the protective conductor, since according to the rules it must be integral and not have discontinuities along the entire length.
In practice, a mixed inclusion scheme is used, combining both previous ones. From the junction box installed in the room, several beams go out, to which a group of sockets are connected. This installation scheme is characterized by a relatively high reliability and a lower consumption of cables and wires. It should be taken into account that powerful consumers of energy, such as cooking hobs, water heaters, split systems, electric boilers, electric boilers and others must be connected by separate wires with their own circuit breakers. The cross-section of the conductors must correspond to the rated value of the circuit breaker, otherwise the wires may begin to melt until the automatic device disconnects the power supply in the protected circuit.
Knowing the number and location of outlets, switches, lamps, room sizes, you can calculate the number of required materials with great accuracy. This also makes it possible to completely calculate and distribute the loads in groups, respectively, with the installation of protection devices, determine the location of the switchboard in a convenient location with a minimum cable consumption. When drawing up the scheme, it makes sense to indicate on the plan of the location of the laying of wires and cables with exact connection to the floor, ceiling, door and window openings, then further they can be avoided when drilling holes in walls for wall cabinets and shelves.
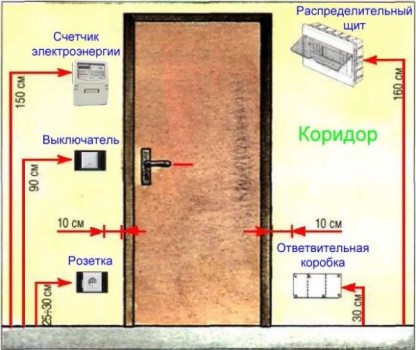
It is worth to carefully consider the choice of the height of the installation of outlets and switches in the house or apartment. In residential premises, outlets can be installed at a distance from the floor that will be convenient for users, but not more than 1 m, and also on skirting boards made of non-combustible materials, if they are specifically designed for this. It is necessary to take into account the length of the cords of home electrical engineering, so that there is no need to use any kind of extension cords. First, it gives some inconvenience, and secondly, the use of a different kind of carry is not always safe.
In rooms with high humidity, such as a bathroom, a shower room, etc. it is allowed to install the outlets provided they are connected through a separating transformer that provides galvanic isolation to the fixed network, or when using a residual current device (RCD) on these lines configured for a pickup current of not more than 30 mA. From the shower door switches and sockets are placed no closer than 60 cm, and from the gas pipelines - no closer than 50 cm. For light switches, the distance from the floor should be kept within 80 to 170 cm, also based on ease of use.
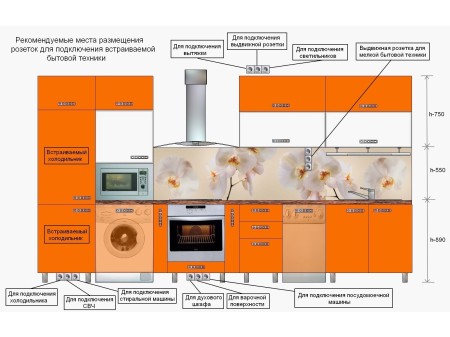
Perhaps, none of the premises of a modern house or apartment is not stuffed with electrical appliances more than a kitchen. Of course, the range of electrical appliances can vary greatly depending on the prosperity of the owners of the house and the size of the room, but usually in the kitchen used household appliances such as refrigerator, microwave oven, coffee maker, hob, oven, extractor, dishwasher, refrigeration chest, and a TV, a music center, a split-system, a washing machine, etc. are often installed. In addition, virtually every house has a coffee maker, coffee grinder, mixer, blender, toaster, sandwich maker, food processor. All this requires very careful planning of the placement of plug sockets in the kitchen. It should be noted that the sockets are not installed above and below the sinks.
Modern flat-panel LCD TVs are most often hung on the wall, so the place of installation of the outlet for its connection should be selected directly behind the TV. By the way, there it is worthwhile to withdraw coaxial cables for connecting cable television, an external television antenna, a satellite dish and a twisted pair. In the bedroom next to the bedside tables it is not bad to install a socket, combined with a light switch. In the place of computer installation, it is necessary to provide 5-6 outlets for the possibility of turning on the PC itself, the monitor, the active speaker, the printer and the scanner, or to prepare an extension cable with the same number of outlets and a switch. By the way, in the standby mode, a computer with a monitor can consume more than ten watts, which will correspond to about 90 kW per year.
Sockets and switches must not be covered with furniture, which must also be provided when designing the wiring diagram. Now there are many designs that do not allow young children to insert any metal objects into the sockets, so do not worry that these sockets are too low, within the reach of the child.
choice of materials
For the installation of a new wiring, the following materials may be needed:
- electrical cable;
- junction boxes;
- sockets, switches, podrozetniki;
- shrink tube;
- corrugated pipe, metal or PVC (PVC) plastic, cable ducts, cable channels;
- automatic switches;
- a switchboard with the equipment listed below.
When performing work to replace electrical wiring, hidden or open wiring may be performed. Concealed wiring can be placed in stitches, which are subsequently plastered together with walls, or under any plating. It is not visible, therefore it is much more aesthetic. Open wiring is located in cable ducts, cable ducts or insulators.
For wooden houses it is necessary to use a cable, in the name of which there are letters NG-LS. NG means "incombustible", it does not support combustion. A cable with such a marking will burn while in flame, but does not itself spread combustion. LS, from English «Low Smoke» - cable with low smoke and gas evolution. It is very good if in the cable, in addition to the external insulation and insulation of the wires, there is an insulating filler between the wires.
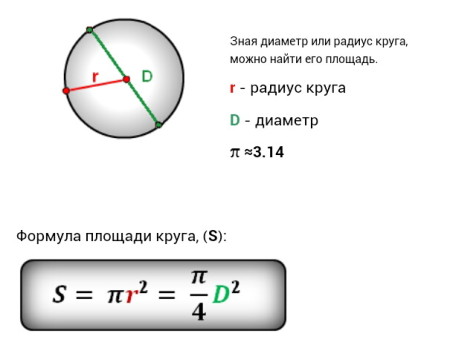
Do not rely on the outer diameter of the cable or wire. The cost of the material from which the insulation is made is much lower than the cost of copper, so unscrupulous manufacturers, in an effort to save, reduce the diameter of the current-carrying wire, masking this by increasing the thickness of insulation. To prevent yourself from cheating, it is recommended to measure the diameter of the core before calibrating the wire and calculate the wire cross section yourself. The cross-section of a stranded wire can be calculated by summing the cross-sections of all the wires.
In addition, sometimes there are wires and cables with veins, which instead of copper are made of a metal alloy. These alloys have b aboutand therefore for a section with the same cross section as copper, they have less load capacity. Therefore, in addition to the wire cross section, it is worth paying attention to the color of the metal and, if it seems that it differs from the usual copper color, then it will be prudent to refuse the purchase of such a wire.
The RCD must have class A, which reacts not only to the constant leakage currents, but also pulsating currents.
For bathrooms it is necessary to choose sockets and switches with the degree of protection IP44, having a visor to prevent water droplets from falling into them. They are protected from contact with live parts by fingers or tools and from splashing from any direction, and the sockets have a closing cover. For dry rooms, there is a huge selection of sockets and switches, the latter can be illuminated to determine their location in the dark. In case of necessity of installation outside the premises, special waterproof outlets are produced, which are completely sealed and safe even if a jet of water hits them.
calculation of the cable section and power equipment
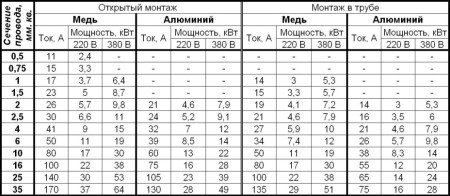
The cross-section of the wires should be commensurate with the current flowing through them, and, hence, the power consumed by the electrical appliances. The cross-section is calculated based on the sum of the powers consumed by the electrical devices connected to this circuit. If, by mistake or deliberately, a wire with a reduced cross-section has been selected, it can subsequently lead to heating of the wiring, melting of the insulation and short-circuiting or even to a fire.
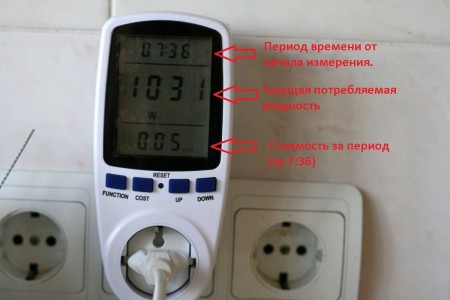
Therefore, it is better to overpay and purchase products from b aboutthe lower the cross section, the more so that it is always necessary to have a stock. If the power consumption is not constant during the operation of the devices, then for calculations it is necessary to focus on its maximum value. Consumption data are usually indicated in the passports for the equipment. There are relatively inexpensive household power meters and power meters that measure instantaneous power and current consumption, power over time, network voltage, and calculate the cost of electricity.
On the Internet there is a large number of on-line calculators for calculating the cross-section of wires.
color-coded insulation of electrical wires
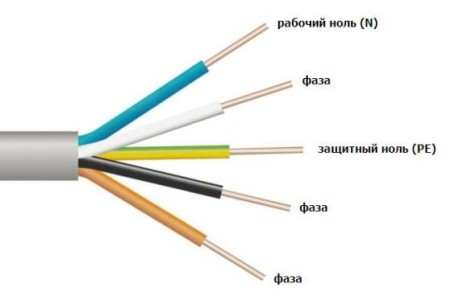
Used electrical cables have wires with insulation of various colors. Color marking helps the installer quickly and without a phase to determine the phase, zero and ground, which greatly simplifies the installation of electrical wiring. Cable manufacturers can use a variety of color combinations, with the ground wire marked yellow and green, the neutral wire black or less often white, and the phase wire the remaining color.
marking of electric wiring elements
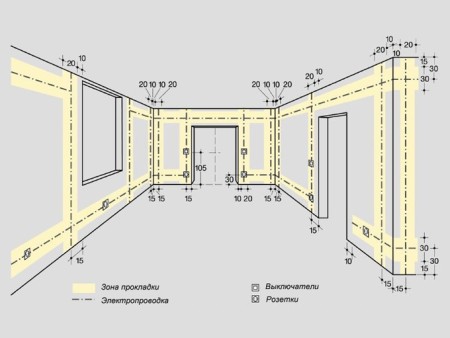
Installation of electrical wiring begins with the marking. A carefully designed wiring diagram with specific locations of the electrical accessories will help to accurately mark all the wiring elements. Initially, pencil on walls and ceilings marks the places where the switchboard, boxes, sockets, switches and lamps will be mounted, then - the place of passage of the wiring connecting these elements.
The laying of the gasket should be carried out strictly vertical and horizontal lines, and the distance to the ceiling should be chosen within the range of 20-25 cm, then there will be room to subsequently be able to do without problems, for example, a suspended or stretched ceiling. When marking the distance from the bottom, you should not forget the thickness of the screed and the floor covering, if they are not already there.
wiring installation
Typically, a complete replacement of electrical wiring is done during major repairs in the house or apartment. Dismantling of old wiring can be carried out if in the future it is planned to use the channels where it was laid. If this is not necessary, and the wires in the future will not interfere or their extraction will require additional costs, it is possible not to dismantle the faulty wiring, but only to ensure that the power supply is disconnected and the insulated wires are insulated.
To fix the cable in the walls holes are drilled, dowels are inserted and self-tapping screws are screwed in pre-prepared lengths of mounting perforated tape, with which the cable is fixed to the wall. For laying it is more convenient to use a NYM cable or, at most, VVGng. Starting from the location of the socket or switch, the cable is fixed to the wall in series. A detailed process of fixing the wiring can be seen in the video below.
When passing through the corner, the cable should be fastened closer to the corner. If you plan to lay a layer of plaster on a small thickness over the cable, then the distance between the mounting brackets from the perforated tape all along must be done as often as possible, so that the cable does not protrude and tightens against the wall. Conversely, if the plaster layer is thick, then the distance between the staples can be increased to approximately 40 cm. On the other hand, if the wire is sagging, then there is a high probability of damage to the wiring by the trowel when performing the finishing work.
After the process of fixing the wires to the wall is completed, the junction box is installed, for which the layout of its location on the wall is initially made. In the wall, using a perforator, an angle grinder or other convenient method, a sample is taken in the wall where the junction box should fit completely, and corners are cut off in order to bring the cables into the box. When determining the depth of the sample, it is necessary to take into account the thickness of the layer of gypsum, which the junction box will be fixed. In the same way places for sockets and switches are prepared.
Before installing the junction box, it is necessary to spray sprinkled water from the spray gun to get rid of dust, and in the box to make holes for cable entry. The entire surface of the groove is laid with a layer of gypsum, diluted with water to a consistency of sour cream, after which a junction box is installed. When the gypsum starts to grasp, it is necessary to carefully, so as not to move the box, clean the inlets where the cables will be wound. With a new batch of diluted gypsum, the junction box is finally fixed in places where there will be no wires, and after it has hardened, it is possible to start wires in the box.
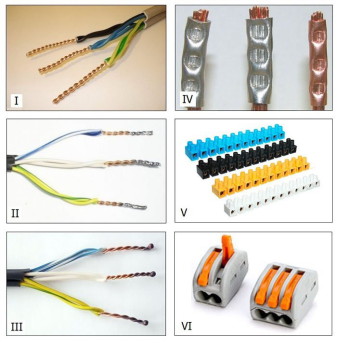
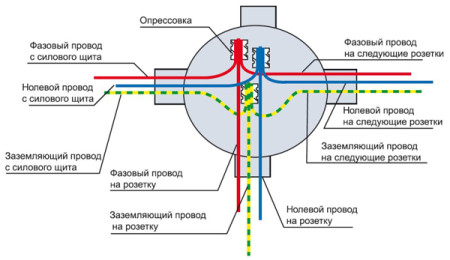
The outer insulation is removed from the wound cables (for cables with triple insulation, two layers are removed), the wires are cleaned and connected according to the scheme in a convenient way from among the ones listed below. In order to be able to carry out any work in the junction boxes in the future and clearly represent the directions in which cables are laid, they must be marked and left at least twenty centimeters of the cable stock.
features wiring harness in a wooden house
In a wooden house, a cable marked with NG-LS must be used. The rules for the installation of electrical installations prescribe in wooden buildings to perform either the installation of open wiring or the installation of concealed wiring in metal pipes with a minimum wall thickness of 2 mm that localizes the combustion. To connect metal pipes by the method of welding in wooden houses is strictly prohibited by fire safety rules, therefore, if necessary, the equipment of the concealed leash is connected by means of a threaded connection, which, however, increases the cost of installation. All podzroetniki, boxes, shields should be metal, have a reliable electrical connection to the pipe wiring and grounding circuit. In addition, if necessary, replacement of wires and cables should be provided. When passing through combustible load-bearing walls and floors, it is necessary to perform the installation of a metal sleeve.
wire connection options
The rules for the installation of electrical installations allow connecting conductors in the following ways:
- soldering with soldering iron or torch using solder and neutral flux;
- welding of wires with the help of specialized apparatuses, inverter-type welding machines or other welding machines;
- pressing with all kinds of copper, aluminum and copper-aluminum sleeves (depending on the metal of the wires used) with the help of a hand press or press jaw;
- self-clamping spring terminals (for example, WAGO, REXANT and others);
- clamping spring terminals;
- clamping screw terminals;
- connecting isolation clamp (PPE).
It is strictly forbidden to make ordinary twisting of wires without welding or soldering, and even more so from different metals, because The resulting galvanic pair will permanently destroy the junction site.
When the electric current passes, the metal is heated and expanded at the junction, the screw clamp is weakened, as a result the resistance of the conductor portion increases, the connection point heats up even more and the contacts can become burned. Therefore, in case of using a screw connection, it is necessary to tighten the screws at least once a year. WAGO clamps or the like have springs in their composition, which independently of the expansion of the metal act on the wire and press it with a constant elastic force.
After soldering, welding or pressing, the connection point of the wires must be insulated, for which it is convenient to use a heat shrink tube.
For installation, it is better to use a single-wire cable or wire, since its twisting will be stiffer and more reliable.
When installing lighting, remember that the zero wire goes directly from the box to the luminaire, and the phase goes to the switch and already through it to the luminaire. Thus, in the course of further operation it is possible not to be afraid that, with the switch disconnected, the wires of the luminaire may be energized.
switchboard equipment
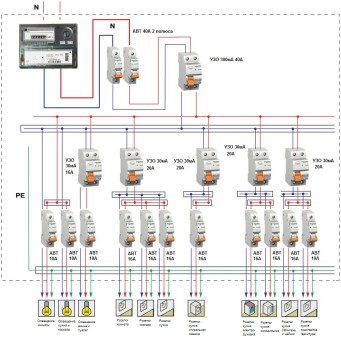
If earlier the wiring diagram provided for the installation of an electric meter with plugs, at best automatic, now it is customary to mount an electrical shield in which a variety of protective and measuring devices can be installed. The location of the shield is not determined by the rules, however, in order to save the cable, it is desirable to install it as close as possible to the branching point of the beams.
The electrical flap in a private house or apartment can contain the following elements:
- automatic circuit breakers that independently cut off the power supply of the circuit in the event of a short circuit or manually de-energize a certain circuit if necessary;
- RCD, which protects a person from electric shock by breakdown of electrical devices on the casing;
- differential automatic machines that perform the functions of a circuit breaker and an RCD, protecting both against short-circuit and from electric shock;
- voltage relay, disconnecting the power supply when the minimum or maximum allowable voltage is reached;
- a digital voltmeter and an ammeter for monitoring the input voltage and the current consumption, capable of storing minimum and maximum values and the number of trips.
In a private house is still infrequent, but such power supply systems as standby generator, solar batteries, wind generator are installed. In this case, the switchboard can be equipped with additional elements to control these devices.
The qualitative power supply for the domestic consumer provides two basic parameters:
- the correct sinusoidal form of the electrical signal;
- voltage of the electrical network.
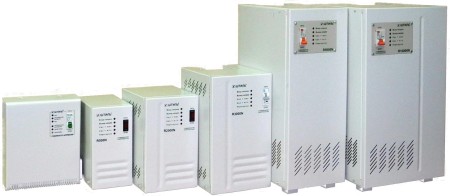
If the first parameter in the household conditions is difficult to estimate, the mains voltage can be checked: under normal conditions, the supply voltage must not differ from the rated voltage of the 220 V system by more than ± 10%. Reducing or increasing the supply voltage in excess of the permissible norm may adversely affect household electrical appliances. In order to bring the mains voltage to the rated voltage in case of sudden surges, it is possible to apply stabilizers: an individual for a certain electrical appliance or a common one for a house or an apartment. The general stabilizer has a large capacity, dimensions, cost and for these reasons can not always be used in everyday life.
To protect devices from too low or high voltages, protection devices - voltage relays are widely used. They are not able to bring the voltage of the network to the permissible, but they can completely disconnect household appliances in order to prevent their failure.
After the wiring and assembly of the switchboard, sockets and switches are installed. Correctly assembled wiring works right away, but still the performance check will not be superfluous. To conduct it, you can do without costly devices, a tester or a probe is enough to prevent the failure of the circuits when power is applied.


