


Each owner of his own garage tries to use his territory with maximum efficiency. Therefore, a lot of people make a cellar in the garage. Despite the fact that city residents use refrigerators and freezers to store perishable food, cellars are still very much in demand. It is almost an ideal place for storing potatoes, vegetables, all sorts of pickles and spins. Quite a lot of people are looking for detailed information on how to make a cellar in the garage, and we will try to consider this issue as thoroughly as possible in this article.
Content
- 1 General information about cellars
- 2 We make a cellar in the garage: the stages of construction work
- 3 Choosing construction materials
- 4 We make the foundation of the cellar
- 5 The walls of the cellar in the garage
- 6 The ceiling of the cellar in the garage
- 7 Waterproofing of the cellar in the garage
- 8 Cellar floors in the garage
- 9 How to insulate the cellar in the garage
- 10 Ventilation of the cellar in the garage
General information about cellars
The cellar in the garage is recommended to make a depth of 1.5 to 2 meters and a width of 2 to 2.5 meters. Even if the dimensions of the garage permit, do not exceed the recommended size.
First of all, it is necessary to draw up a plan for the upcoming construction works. Despite the fact that, at first glance, the construction of a cellar in the garage with their own hands looks like a simple task, the plan will help correctly calculate the necessary amount of building materials, and greatly simplify and accelerate the fulfillment of the task. The cellar needs to be done, having retreated from the garage wall at least half a meter - this place is necessary for installing the waterproofing layer.
If your garage is on a ribbon foundation, then it can be used as a wall for a cellar. Thus, you can save a little, but use this option only if you are completely sure that you will not harm the building.
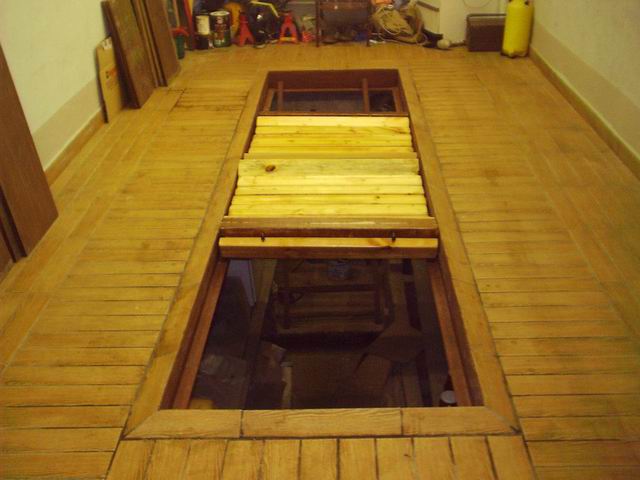
When compiling a work plan, be sure to include a waterproofing and a ventilation device. There are many ways to make a cellar in the garage. However, one of the most common and practical is the entry through the hatch using the most common staircase. If the area of the garage allows, you can make a descent into the cellar in the form of concrete steps.
All existing cellars can be divided into two types depending on the location: located under the premises and standing apart from them. In our case, the cellar will be located directly under the garage, and its appearance, respectively, is determined by the depth. As a simplified version of the cellar, in the garage you can make a semi-buried pit for storing vegetables. To make it quite simple - the principle is in many respects similar to the observation pit. In some cases, a large metal barrel or cistern is dug into the ground to store vegetables.

Semi-buried storage can be done even in places where groundwater lies close to the surface, because its depth is only 0.7-1 meter. The walls of the storehouse are made of concrete, slag concrete or laid out of bricks. As a waterproofing, inexpensive coating materials or clay locks are used.
However, most often under the garage make a fully buried cellar. The most rational is the depth of the structure from 1.5 to 3 meters. More detailed calculations of the depth of the future structure are carried out on the basis of data on the depth of occurrence of groundwater. The bottom of the cellar should be at a height of not less than half a meter from the groundwater level.
We make a cellar in the garage: the stages of construction work
Before you start directly to work, you need to consider several important requirements:
Before you begin to dig a pit under the cellar, you need to make sure that you can dig a foundation pit of the required depth (up to 3 meters). The fact is that at such a depth in urban conditions, various communications are often laid. In addition, as we have already mentioned above, it is absolutely necessary to investigate the level of occurrence of groundwater.

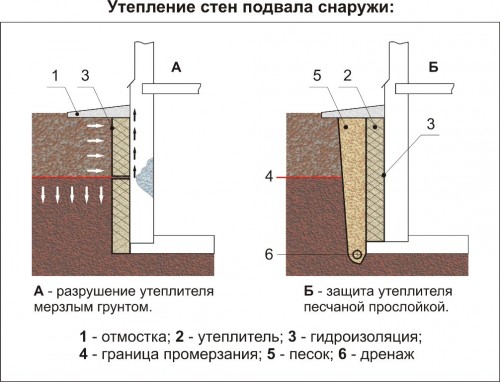
It will not be superfluous also to remind that the cellar facilities under the already prepared building, from the point of view of professional builders, are not entirely literate. But if the issue is considered resolved and there is no discussion, it is necessary to take measures against flooding the cellar. Remember that it is impossible to eliminate the source of underflooding by groundwater, it is better to prevent an unpleasant situation in advance and arrange a circular drainage system.
Choosing construction materials
Quite often, the owners prefer a certain building material, based on its value, especially when they want to save money. The fastest variant of building walls in the cellar is the installation of reinforced concrete slabs. But to save in this case it will only be time, as the plates are very expensive. Prices for concrete and granite are much more democratic. If you decide to lay out the walls of the future cellar with a brick, then you need to choose only quality, well-burned material. Silicate brick and cinder block in the construction of the cellar is not recommended.
When constructing the basement in the cellar, use concrete grade M100 or make the concrete mixture independently: cement grade 400-500, sand and small gravel. When pouring the floor and for plastering the walls, use a cement-sand mortar.
For formwork it is recommended to take only whole solid boards. As an economical budget option, you can use roofing material - several layers are glued to the wall with the help of heated bitumen.
We make the foundation of the cellar

Construction work on the foundation of the foundation begins with digging the foundation pit. After the pit is ready for the required depth, its bottom is leveled, cleaned of debris, carefully compacted and covered with a layer of small gravel about 3-5 centimeters thick. Then lay a layer of concrete 5-7 centimeters.

After the concrete is frozen, you can proceed to waterproofing: lay several layers of roofing paper, gluing them well heated bitumen. An important point: the edges of the waterproofing should protrude 10-15 centimeters beyond the boundary of the wall. Next, formwork is installed and concrete is poured.
The walls of the cellar in the garage

The method of masonry is chosen depending on the building material. For example, if the walls are brick, then the simplest method of masonry, with bandaging, is used. In the process of brick laying, we do not forget to use the building level and plumb line - even though it is a cellar, but the walls must be level. All the seams between the bricks should be carefully wiped from the outside and from the inside. Ready walls of the cellar need to be covered with a layer of lime - this will prevent the development of mold and rot.
The process of pouring monolithic walls is a little easier, however, the process is somewhat laborious because of the need for the construction of the formwork. It is going to be as follows: the shields from the flat and strong boards are knocked down, metal bars are hammered along the entire perimeter of the basement, to which the formwork is fastened, after which concrete is poured. Each layer of concrete with a thickness of approximately 40 centimeters should be carefully ramped.
The ceiling of the cellar in the garage

Very often to simplify and work as a ceiling overlapping cellars use reinforced concrete slabs. In the plate make a hole for the hatch, on the base of the garage space mark the level of installation of plates.
Installed plates are covered with a layer of bitumen and insulated with a mineral wool, glass wool, or a mixture of sawdust with cement. The layer of insulation must be at least 15 centimeters.

Closure the insulation lining or slate, and if an additional layer of insulation was installed, the surface of the ceiling plastered.
Waterproofing of the cellar in the garage

For waterproofing works, you can use expensive modern materials, but if you want to save a little, you can use cheap, traditional time-tested materials. For example, you can use the same ruberoid and heated bitumen. The ruberoid is applied in several layers, treated with bituminous grease on top and sprinkled with coarse sand.

For the inner side walls in the cellar is perfect for the so-called mixture for penetrating waterproofing. The uniqueness of this type of waterproofing is that it does not create a film on the surface, but penetrates into the wall, thus turning it into a completely waterproof monolithic structure.

Manufacturers of this material argue that the mixture is able to penetrate the wall to a depth of one meter, while creating insoluble crystals. The main advantage of the penetrating mixture is that it can not be damaged, and the service life of the waterproofing is equal to the service life of the wall itself. Crystalline formations fill all the voids inside the wall, thus blocking the access of moisture. Interestingly, the wall does not lose the ability to "breathe".
By treating the concrete wall in this way, you will greatly improve its technical characteristics, in particular it will be able to withstand the pressure of water under pressure to 20 atmospheres.

Another advantage of penetrating waterproofing is that it does not need to use expensive tools for its application - a wide paint brush, the garage owner can perform this work independently without involving specialists.
Cellar floors in the garage

The most preferred material for the floor in the cellar under the garage is reinforced concrete. You can use a finished reinforced concrete slab, or pour the floor yourself. To do this, a layer of small gravel is poured onto the leveled surface and it is rammed properly. Further, the rods from the reinforcement are installed - the basis for the grid. After that, the net itself is mounted and covered with a layer of concrete in such a way that the protective layer is at least 3 centimeters.
How to insulate the cellar in the garage
As a heater for walls in the cellar is best to use expanded polystyrene, it is mounted from the outside of the walls. It is completely waterproof, resistant to mold and fungi material with a long service life.
To isolate the walls of the cellar from the inside, the material PSB-C 25, having a thickness of 50 mm is used. Warming walls of the cellar on both sides, you will ensure a stable temperature. If you insulate only the inner side of the walls, then on their surface will form a condensate.

For the thermal insulation of the floor in the cellar you can use ordinary sawdust. To do this, they lay a layer of 40 cm, and carefully rammed. Above lay a layer of roofing material and make a cement screed. Several layers of heated bitumen are applied to the fixed screed.
But especially careful attention should be paid to the insulation of the ceiling, as condensate forms on its surface under the influence of cold air. If the ceiling slab of the cellar was a finished cooker, then it is necessary to build a kind of insulated false ceiling. This is done as follows: in the walls, at a distance of 15-20 cm from the ceiling, the pipes are fixed, after which a grid of reinforcement is mounted on them. The whole construction must be painted. Empty space between the plate and the grid is filled with a layer of insulation - you can use a mineral wool or glass wool.
Ventilation of the cellar in the garage

There are two versions of ventilation systems: natural and forced. The first - quite simple and cheap, involves the installation of exhaust and supply pipes, due to which the air in the basement freely circulates. The exhaust pipe is installed near the ceiling, and the supply is set so that its lower end is 10-15 centimeters from the cellar floor, and the top one is half a meter above the roof of the garage. The outer edge of the exhaust pipe is covered with a mesh. In addition, over the both ends of the pipes you need to place the covers.
Forced ventilation is a more expensive and complicated option. To install it in the exhaust pipe, install a fan. During operation, the fan expels stagnant air to the street, and fills the cellar with fresh.

The most optimal variant of cellar ventilation is a combined one, that is, installation of both natural and forced ventilation. Forced ventilation is needed in the warm season - when the temperature on the street and in the cellar is almost the same.
The final stage of the construction of the cellar involves the installation of a manhole cover and a ladder. Before the beginning of the season of blanks in the cellar, shelves for cans are mounted.

Before you start the operation of the cellar, it needs to be dried and disinfected thoroughly - 10 tablets of alcohol are burned inside.


