


Finishing works are always the most pleasant - even a little bit and you can admire the new repair. The simplest method of finishing rooms in living quarters is the wallpapering of walls with wallpapers, made by own hands. This article tells you how to prepare walls, what types of wallpaper the market offers and how to properly glue the wallpaper, and having previously made all the necessary calculations.
Content
Despite the variety of facing materials, wallpaper remains the most popular material for creating a cozy atmosphere and a unique style of living quarters. Here there is where fantasy will be waxed, and satisfaction from the work done will more than pay for all the efforts.
So, where does the walling begin? Naturally with surface preparation. But before that you need to choose wallpaper, and there are very, very many! Skillful designers masterfully connect different types and types of wallpaper, getting creative and unique stylistic solutions. It should be taken into account that different wallpapers fit different rooms. For example, it is best for children's paper to use paper - they are the most environmentally friendly, they are easier to replace in case of damage, they are also the cheapest. For the kitchen and the corridor the most suitable washable wallpaper, resistant to wet cleaning.
How to prepare the walls
The choice of wallpaper for pasting walls is not an easy task. But, when this issue is resolved, it's time to start preparing the surface for pasting. From the surface to which the wallpaper will be glued, depends on their appearance and the quality of the work itself - the surface should be as ideal as possible. If the base under the wallpaper is made of gypsum board (GKL), then it is easy enough to perform easy puttying and sealing of the joints of the sheets.
When pasting ordinary walls, their surface is pre-cleaned, primed (for example, CERESIT CT-17) and brought to a smooth surface with plaster. It's best to use Rotband, it's more convenient to use.
After drying, the walls are primed again. Then the prepared surface can be puttyped. This point should be approached with the utmost care - this is the main final stage of preparing the walls, this alignment is the most subtle. After it, the walls are sanded with special fine hand grinding or a grinding machine. Work with this will have a maximum protection of the respiratory system - there will be a lot of dust.
After sanding, the dust is removed from the walls by a construction vacuum cleaner. The usual household vacuum cleaner should not be used for this.
There is another way - to take a damp rag and to remove dust from the walls. After the dust is removed, the walls are primed again. Now the preparatory stage is over, you can proceed to the wallpaper.

Counting wallpaper
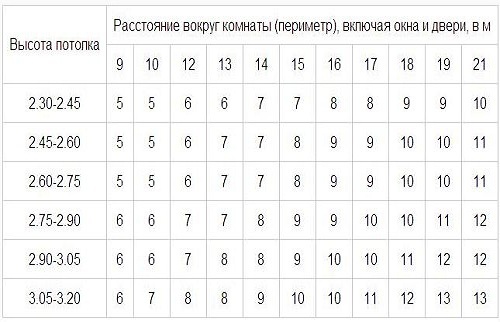
Calculating the required number of wallpapers for the room is a serious matter. The easiest way is to use the calculator for calculating wallpaper - a special on-line program that helps to accurately calculate the required number of rolls. Self-calculation begins with an accurate measurement of the size of the room. The wallpaper calculation table can help here, in which any type of material is taken into account.
Attention! You should always buy rolls of wallpaper from one lot, because in different parties the shade of the picture may be slightly different.
perimeter calculation
- The height of the walls and the perimeter of the room are measured - the sum of the lengths of all the walls. For example, the room has a wall length of 3 m and 6 m, therefore, the perimeter will be: 3 + 6 + 3 + 6 = 18 m - this is the total length of the room on the walls. If the wallpaper is pasted not to the ceiling, then the required height of the pasting is taken for calculations.
- Calculation of the number of strips in a roll. To clarify the yield of the bands, you need to divide the length of the roll into the height of the wallpapering. Let's say, the height is 2.5 m, and the length of the standard roll of wallpaper is 10 m, therefore, 4 strips will appear from this roll: 10 / 2,5 = 4. At a height of 2.7 m, you need 10 divided by 2.7, it turns out 3.7. This means that at this height there will be 3 whole strips (at 2.7 meters) and a remainder. When buying, always take into account only whole strips. The remainder of 0, 7 should be multiplied by the height of the room: 0,7 x 2,7 = 1,89 (m) - this is the length of the remainder of the roll. Such a piece will be used in places above the doors, windows, behind the batteries.
- Necessary number of bands. The calculation is as follows: the perimeter of the room is divided by the width of the roll. The standard roll width is 0.53 m, then: 18 / 0.53 = 33.9. The resulting value is always rounded to a larger integer value, that is, 34 strips are output for the entire room.
- Calculation of the number of rolls. For this, the number of all the bands is divided by the number of strips in the roll. At height 2, 5 it turns out: 34/4 = 8,5. After rounding, 9 rolls exit. For a height of 2.7, the calculation is similar: 34/3 = 11.3. We get 12 rolls (after rounding), but with a small remainder it is possible and 11. On a different width, the calculation is the same, but instead of 0.53 it is necessary to set the width of the selected roll.
This is a general calculation without taking into account the door and window openings. If the openings are large, then they can be subtracted from the general perimeter and calculate the required number without them. But always take into account the fact that there should be a minimum stock of wallpaper.
area calculation
- With a wall length of 3 m and 6 m, the area of the room will be: 3x6 = 18 m 2. Multiplying this indicator by the height of pasting, we get the entire area on which the wallpaper will be glued. For example, at a height of 2.5 m it turns out: 18x2.5 = 45.
- The surface area of one standard roll is: 10x0.53 = 5.3 m 2. Thus, such a roll can be pasted 5 m 2 walls. The balance is not taken into account.
- To calculate the number of rolls, the total area of the walls is divided by the area of one roll: 45/5 = 9. As in the case of calculations around the perimeter of the room, 9 rolls are produced.
If the wallpaper has a drawing that does not need to be adjusted, then the calculations are carried out according to the usual scheme.
calculation of wallpaper with a picture
This is the most difficult calculation. Wallpapers with ornate patterns or strict geometric patterns require the integrity of the print. Here it is necessary to consider rapport - this is the distance between repeating elements. Usually rapport is indicated on the description to the wallpaper, where the length and width are indicated. The wallpaper has a large expense - the more rapport, the more waste. This should be considered when choosing. For such calculations, it is easiest to turn to specialists in the store. For the stock, you will have to purchase one extra roll, in case of an unexpected error.
What is needed from the tools
With a serious approach to wallpapering the wallpaper with your own hands, you should purchase a tool for wallpapering, in order to perform all the work on a professional level: qualitatively, quickly and with minimal errors. You will need tools for preparing wallpapers and directly for pasting.
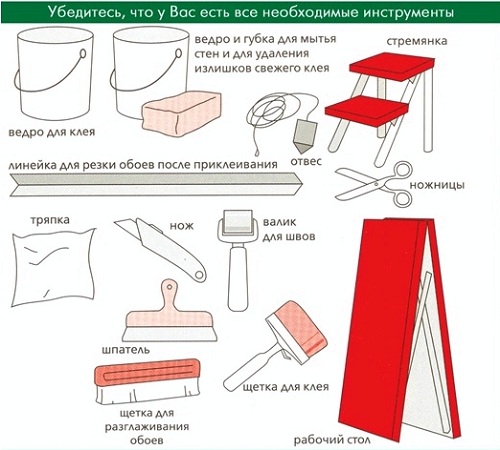
- Scissors, pencil, chalk, metal ruler, roulette. The working ends of the scissors must be long - so it is more convenient to cut the strips. Chalk is needed for marking the lines of application of wallpaper.
- Knife wallpaper. The cutter with replaceable or retractable blades is very convenient, as soon as the blade begins to dull, it is quickly replaced or the used sections are carefully broken off.
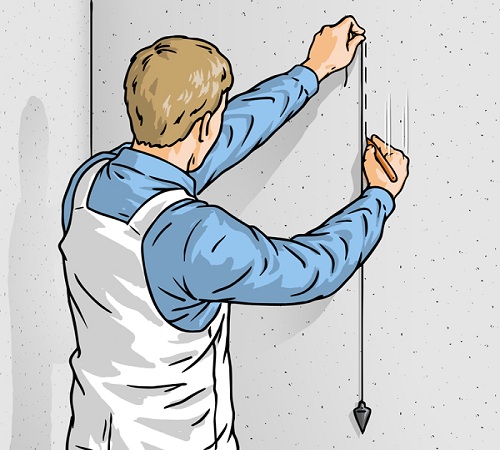
- Cord and plumb line. With these tools, the horizontal and vertical lines that are needed to accurately apply the rolls to the wall are beaten. The cord is chosen to be 1 meter longer than the length of the wall.
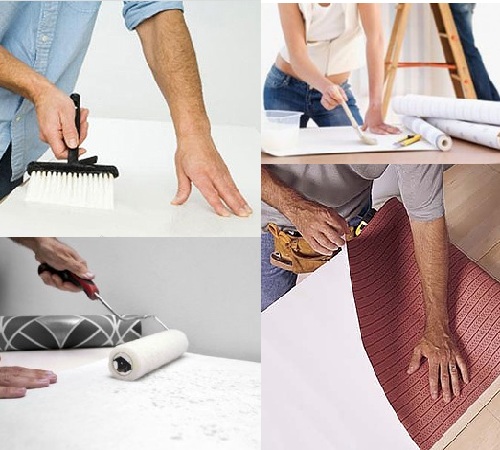
- Brushes or short-nap rollers. Designed to apply glue to the back of the wallpaper before the label. Small brushes are needed for gluing strips in the corners, near skirting boards, at the top of the walls.
- Rollers for joints. Made of soft plastic or wood. Do not use them on nap or delicate surfaces.
- The rollers are smoothing. They are used for extruding air. For delicate and fleecy wallpaper use rolls of felt, in other cases - of rubber.
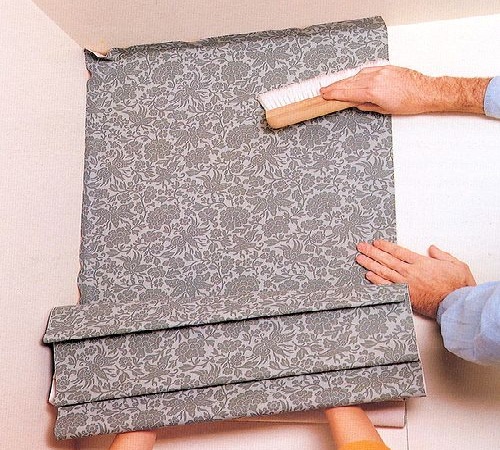
- A brush for wallpaper. Serves for smoothing the wallpaper, removing air bubbles and excess glue. Bristles must be soft, but springy and elastic.
- Table. It is very convenient to apply glue to wallpaper, laid out on a special table, although there is no point in buying such a thing for a one-off wallpapering of wallpaper. The easiest way is to spread the wallpaper on the floor of the room. In this case, it is necessary to cover the floors with polyethylene film for protection.
- Putty knife. Needed for smoothing, very handy, but can only be used on wallpaper with a smooth, durable surface. Used as a cutting line when cropping wallpapers.
- The bathtub is made of plastic. This is a glue tray that has a special surface for removing excess glue from the roller.
Glue and admire
Directly the technology of pasting walls with wallpaper depends on the type and type of the chosen cloth. For example, when pasting thin paper rolls, it is recommended to pre-glue the walls with facing paper. This same advice is also relevant when choosing wallpaper too bright or dark shades. If you choose vinyl heavy wallpaper, you will have to cover with a layer of glue and walls.
Attention! When gluing walls with wallpaper, there should be no drafts in the room. Do not open the windows for ventilation until the wallpaper dries completely (12-24 hours).
There are two methods of gluing:
- Buttock. This is a modern method, in which two bands are combined with edges. The only condition - on the instructions to the wallpaper should be the label "glue to butt".
- Lapped. Here, each successive band enters the previous one by 1-1.5 cm.
process technology
- Rolls must be deployed, checked for defects, compatibility of the pattern and shades of color.
- On the tape measure tape measure the height of pasting. If you need to combine the picture, you need to consider rapport.
- All the canvases can be immediately cut to the required length only if the height of the walls in all places of the room is ideally the same. In a room with differences in the height of the walls, each canvas is cut off separately, after preliminary measuring the wall in the right place. Attention! There are types of wallpaper that are cut from the common roll directly after gluing, for example, glass fiber.
- The marking of the first strip is carried out by a plumb line. This is an indicative line. With uneven walls, you should constantly check the clarity of the vertical line for each strip.
- Glue is diluted in accordance with the attached instructions. Dense smeared stripes are folded inside the adhesive side and soaked for several minutes (5-7). After that, the glue is applied to the wall and the wallpaper is glued. On thin wallpaper, no glue is applied - in this case the wall is smeared. In other cases, the adhesive is applied only to the wallpaper. Always mark the top of the wallpaper, to prevent mistakes in gluing the top and bottom.
- When applying wallpaper to the walls, the pattern is adjusted (if necessary).
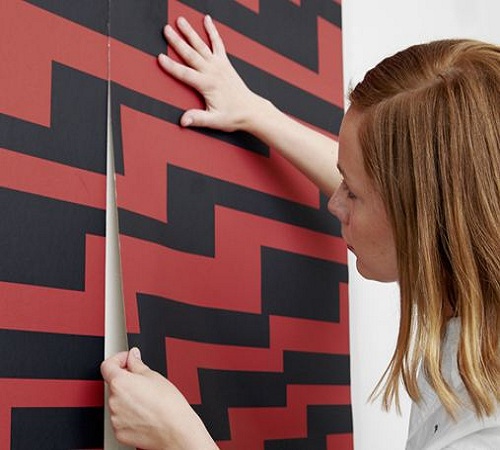
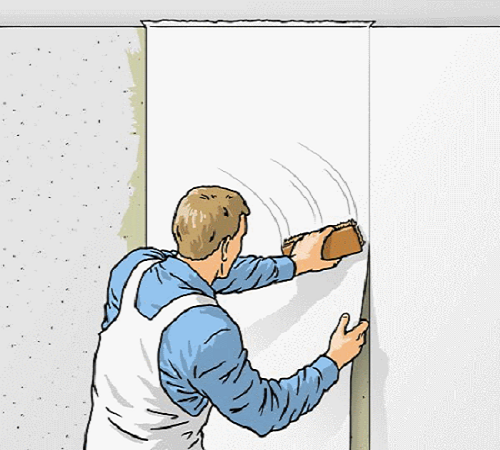
- To the wall, the wallpaper should be applied from the highest point, gradually smoothening them to the sides and down. It is necessary to smooth the wallpaper so as to remove air and excess glue from under the canvas. Depending on the type of fighting, this procedure is performed by a roller or pressure trowel, but always from the center to the edge.
- If the wallpaper is glued to butt, then the edges of the strips are brought to each other. It should be done very carefully, with light movements, so as not to damage the surface. The gaps between the bars are not allowed. With this method, it is best to use a special tape that sticks along the edges of the bands, it will reduce the discrepancy and prevent the appearance of gaps.
- Uneven corners in the room are spliced overlapping two strips, or one, cut along. The first strip comes to the second not more than 3 cm. After that, you can cut the joint place, if all the other wallpaper are glued to butt. This method allows you to prevent the bevels and deformation of the wallpaper in the corners.
- When pasting wallpaper, lapping is always advised to start the front page from the window. In principle, this is correct, but if there is another, stronger permanent source of lighting, it is better to go from it. When pasting the butt is not so much.
- After gluing and smoothing, trim the strips near the ceiling and skirting boards (if they were installed before the wallpaper is pasted).
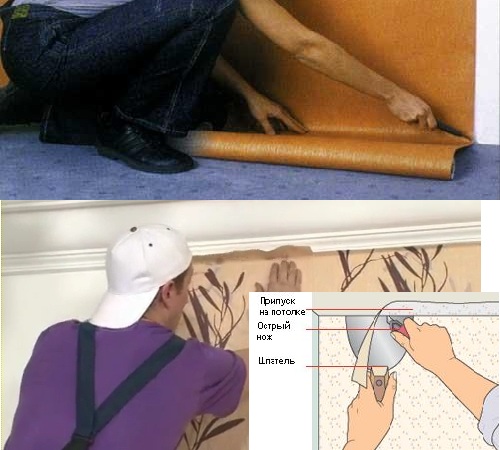
It should be noted that the places above the doors and windows, as well as under them are pasted in the last place. With a large print all the work is done sequentially, it is necessary for careful selection and correct convergence of the picture.


