


The kitchen in our house is a multifunctional room where we not only cook and eat food, but we also gather with friends and family over a cup of coffee, tea or something stronger, we spend time for pleasant communication. And this means that the kitchen should be as comfortable, cozy and stylish as possible. Therefore, doing repairs in the kitchen, you need to make every effort to make this room "candy." If you believe the designers, then the main attention in the repair process must be given to the walls. And this is really so, because it is on the walls that they pay attention most often. Naturally, a lot depends on your financial condition, the amount of money that you are willing to invest in repairs. But the modern market offers such an abundance of finishing materials that it is always possible to choose something according to their capabilities for the optimal price / quality ratio.
Content
Painting the walls in the kitchen

This is perhaps one of the simplest and affordable ways to repair kitchen walls that do not require the use of a complex expensive tool and the availability of professional skills. Do not have to also buy expensive materials for wall finishing. However, with some nuances of the process, it is still necessary to become acquainted.
You need to start by preparing the surface of the walls. To begin with, we completely remove the old finish. If the walls of your housing are concrete, you need to get to the bottom.

After this, the wall must be thoroughly impregnated with a primer. It is recommended to use a deep penetration primer, which, penetrating deeply into the material, creates a good surface layer and forms a film with high adhesion. After the primer has completely dried, proceed to leveling the walls. To do this, we use a coarse-grained filler. The stronger the unevenness on the walls, the thicker will be the layer of putty. However, do not get carried away and apply a layer thicker than 5 centimeters - it is better to leave a small unevenness than to close the cracks. Once the putty is fully seized, we ground the wall again, wait until the primer dries. Next, we apply a thin layer of finishing putty, so that the wall surface is smooth and even. This layer is also dried. Now we will need a small nazhdachka or mesh for grouting putty, as the wall needs to be finished - on the surface there are inevitable marks from the spatula and small clumps of material that need to be removed. We grind slowly, without pressure, in circular motions.
The last stage of the preparatory work is priming the prepared wall immediately before painting and then drying the primer. As you can see, preparing the walls for painting takes more time than, actually, the painting itself, as the primer and putty dry for a long time.

The most, in our opinion, suitable variant of painting walls - the use of paint on a water-based basis. This paint has many advantages. One of the main things is simplicity in work. Let's start with a few important points. The first - the paint should be applied in two or three layers. Second - each subsequent layer is applied "on wet" - that is, there is no need to wait for the previous layer to dry. The third is to apply the paint in such a way that the last layer lies in vertical strips. That is, if the paint is applied to the wall in two layers, then the first layer is applied horizontally, and the second layer is vertical. If the layers are three, then the first and the third are applied vertically, and the second horizontally.

All stripes of paint must be overlapped. To apply the paint, we use a fleecy roller (not foam rubber!)
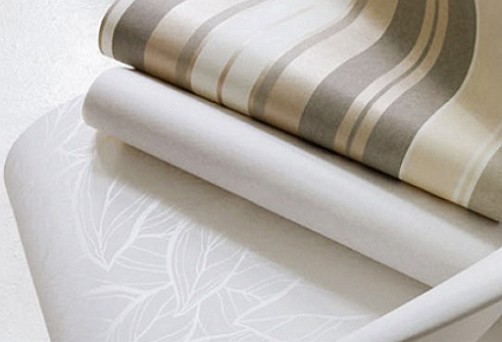
Wall decoration in the kitchen: wallpaper

It is also one of the most affordable and inexpensive ways to decorate walls in the kitchen. The process of wallpapering will require you to be accurate and attentive, especially if you bought wallpaper with a picture - you will have to accurately customize the picture on each strip. As in the case of painting the walls, it is necessary to start with surface preparation. The process is practically no different from the above, with the only difference is that the finish putty is not necessary to apply - just align and wallow the walls.
After the walls are processed, we cut the wallpaper into strips of the required length. Important point: the length of the wallpaper strip should exceed the height of the wall by at least 10 centimeters.
Next, prepare the glue according to the attached instructions. The finished adhesive solution is applied to the back of the strip of wallpaper and firmly presses the strip against the wall, leveling it with a plastic or rubber spatula, you can also use a clean roller.
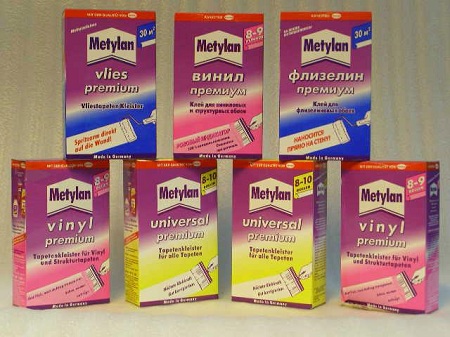
Be sure to remove air bubbles and excess glue from under the wallpaper. Remains of glue that come out, clean with a clean cloth. Similarly we work with the rest of the bands. Unforgettable to accurately set the bands relative to each other.

Perhaps, the most difficult moment in the process of wallpapering is work in the corners of the room. To do this, two strips of material on adjacent walls are glued overlap. An acutely sharpened knife is exactly in the corner making a vertical incision. Remains of wallpaper remove, under the edges of the adhesive solution, level the edges of the roller.

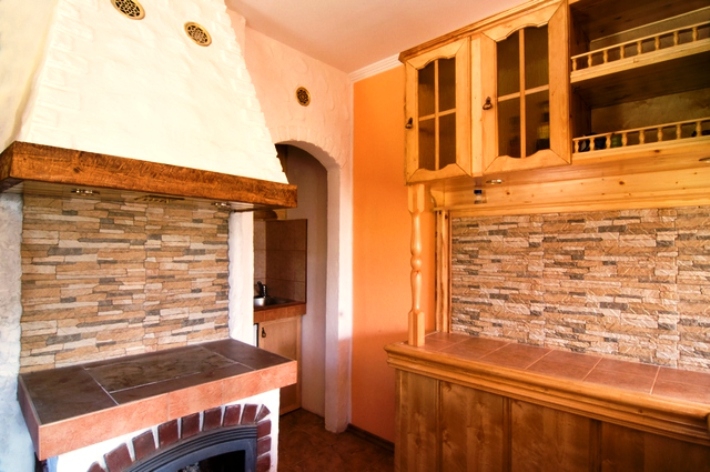
Wall decoration in the kitchen stone
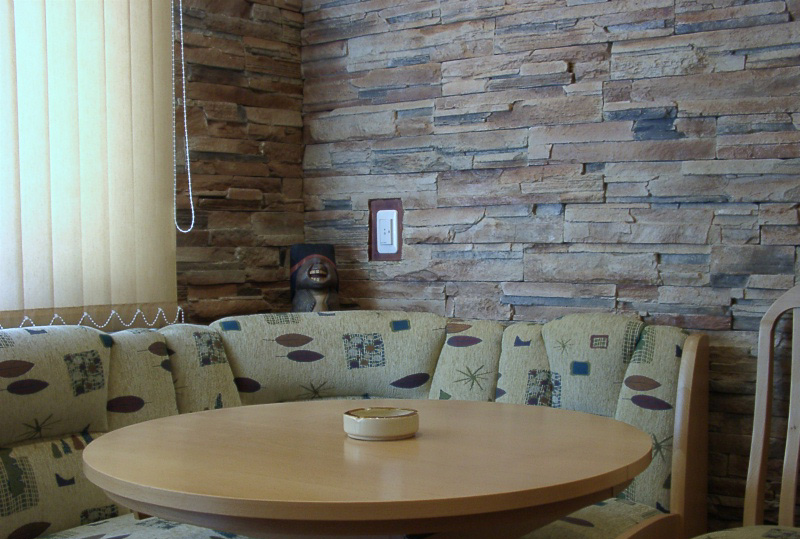
It is necessary to clarify at once that wall decoration with natural stone is a work that requires the use of an expensive tool, as well as the availability of professional knowledge and skills, without which you are unlikely to cope with this task. But as for the decorative or artificial stone, it is, in fact, the same facing tile, which is simple enough to paste on pre-prepared walls with the help of glue mortar or liquid nails.
Types of stone used for wall cladding
- Marble

- Granite

- Limestone

- Sandstone

- Slate


- River stone

- Travertine

- Tuf
The first two types of facing material - a natural stone, the cladding from which you are unlikely to meet in stredne statisticheskoy apartment - the price of the material and work with it, unfortunately, are inaccessible to the majority of the population.
A cheaper and more affordable material is considered an artificial stone, which is made of sand, limestone clay with the addition of synthetic materials.
Artificial stone is a rather popular facing material for several reasons:
- In the manufacture of artificial stone, natural materials are used: sand, limestone, clay. Therefore, the decorative stone is environmentally friendly, which is very important for the kitchen.
- Decorative stone is quite strong, resistant to changes in temperature, high humidity, mechanical damage.
- Artificial stone is a budgetary finishing material, at a price affordable to almost everyone.
- A wide selection of colors and textures allows you to combine this facing material with any interior elements.
- Artificial stone is an easy and compact material, it is easy to transport.
- Decorative stone does not attract dust and does not accumulate dirt, it is antistatic, which makes it much easier to care for the lining - it is enough to wipe the surface with a damp cloth.
- Decorative wall decoration in the kitchen with a stone will help to hide inaccuracies, and will become one of the main decorations of the kitchen.
Variants of decorative stone in the kitchen:
Kitchen apron
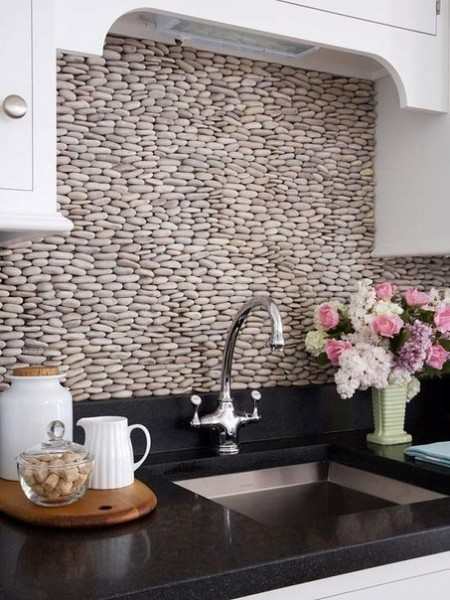
It is not necessary to stone all the walls in the kitchen - it is enough to apply it in the working area, which is intensively exploited. A kitchen apron made of decorative stone can be used as a detail of the interior of the kitchen due to the variety of textures, colors and forms of artificial stone.
Walls
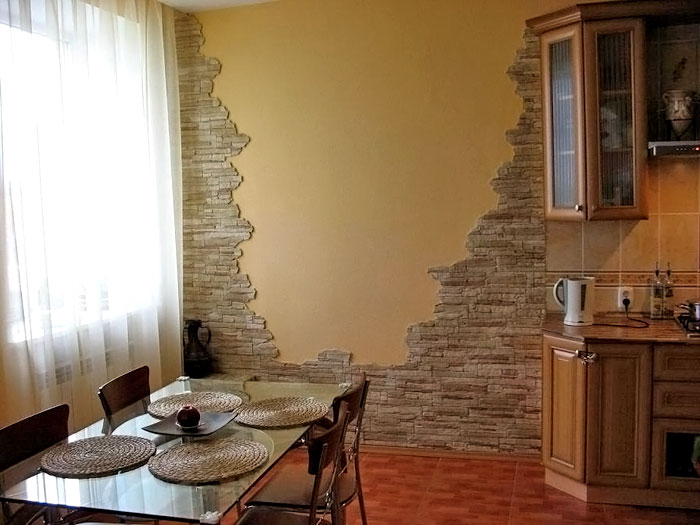
If the decorative stone oblong form horizontally to lay on the walls, it will visually expand the space. To achieve greater effect, you can not stone the whole wall, but only part of it. Near the stone wall part of the wall, you can put a large vase of flowers.
Partial decoration of the kitchen with artificial stone
If you decorate the corners with an artificial stone in the kitchen, they will look like elegant columns that will give the kitchen room a touch of the Middle Ages. When facing the room with artificial stone, provide high-quality lighting in the cladding.
Finishing of door and window openings
Decorating doorways with artificial stone is most often used in the absence of doors. With the help of artificial stone, the doorway can be given similarity to the entrance to the cave or grotto. This simple trick will undoubtedly surprise and delight your guests.
Ventilation box finish

Ventilation does not fit into any interior, and with the help of artificial stone, the ventilation box can be turned into a false fireplace or an elegant column.
Wall tiling

Ceramic tiles - the traditional facing material for the finishing of kitchen facilities. Such popularity is understandable, since this material is excellent for the kitchen. The tile is easy to wash, it is durable, resistant to temperature changes.
Today, manufacturers offer a wide range of products: wall tiles, kitchen tile for apron, floor tiles - glossy, matte, smooth, textured, etc. The choice of colors is so wide that it can satisfy the most sophisticated buyer.
tips on laying the tiles with your own hands
The preparatory stage, as in the case of painting, begins with a thorough stripping of the walls. Completely remove the old coating, level the walls with plaster, and treat it with a primer of deep penetration.

Next, determine the vertical and horizontal using the building level, as an option - use the plumb line. If you plan to tile only the apron, you need to map a horizontal line on the wall in the right place, which will denote the lower boundary of the tile. Along the line we attach a metal profile to the dowel.
Adhesive for tiles is a dry mixture, which must be diluted with water to the desired consistency. It is most convenient to stir the glue with a special nozzle on the drill or perforator. For convenience, on the back of the tile, mark the top with the arrow and add the tile to the piles.

Ready adhesive mass is applied to the back side of the tile over its entire area with the help of a notched spatula, the excess glue is carefully removed.
We begin to lay the tiles from the bottom - apply them to the wall and press them with effort. To improve the adhesion of tiles to the surface, it must be previously soaked in water for about half an hour. To ensure that the seams between the tiles are the same, use plastic crosses of the desired thickness.

After the first tile next we lay the next ones till the end of the first row. Next, put the next row, not forgetting to periodically check the plane of the wall level.
On the wall, the tile can be arranged in several ways:
- "In the dressing" - the tiles are offset relative to each other half of its width.
- "At the seams" - the tile is placed one next to the other along the horizontal and vertical seams.
- "Diagonally" - rows of tiles are located at an angle of 45 degrees to the horizontal. This method requires a lot of material consumption due to a number of undercuts.
In the process of work, you will inevitably have to cut the tile. Doing it the easiest way with a tile cutter, but if there is not one, you can use a conventional glass cutter or a diamond-grinder. Important: the Bulgar must be a small "clean", a large circle will tear pieces of the cover from the tiles.
To beautifully decorate the corners and ends of the tile, plastic corners are used. The angle should exceed the thickness of the tile by several millimeters to hide the edge of the tile underneath.
About a day later, when the glue completely withers, you can begin to trowel the seams between the tiles.

First, we remove plastic crosses from the seams. Sometimes it can be difficult to do, so you can use a small hook made of thin steel wire. The trowelling mixture can be used in the same color as the tile, or you can choose a contrast. Dry grout is bred to the required consistency and gently rubbed into the seams with a spatula. Remove excess filler with a damp cloth.
Walls in the kitchen: paneling

Plastic panels for the kitchen are strips up to 3 meters long and 10 to 25 cm wide. They are mounted on a wooden or metal frame. Profiles are installed at the joints and corners.
From the advantages of this material it is necessary to note:
- Variety of colors and textures.
- Water resistant.
- Simplicity and ease of installation.
- Low cost.

But there are several disadvantages: fire hazard and low resistance to mechanical damage.
An important advantage when working with plastic panels - no need for thorough preparation of the surface. Of course, if as an old coating on the hay is a tile or old panels, they will have to be dismantled. Wallpaper and old paint can not be touched. The main thing in installing plastic panels is, of course, the assembly of the frame. If you make a frame of wooden slats, treat them with an antiseptic.
Further work is carried out in the following sequence:
On the wall we draw horizontal lines at a distance of 50-60 cm from each other. On this line, we mount metal brackets for rei in steps of 50-70 cm. The brackets are attached to the walls by screws and plastic dowels. In the brackets we insert the slats and fasten the screws. Reiki should be fixed strictly on the level.

After the frame is ready, proceed to its plating. To start, along the entire perimeter on the slats, the L-profile is installed. In the corners and corner turns establish an angular profile. To trim the framework with panels, you need to start from the corner. If the framework is wooden, we fix the panels with a stapler, fasten the screws to the metal frame to the metal frame.
Each next panel must be inserted in the groove of the previous one.
Difficulties can arise with the last stripe, as it is most likely to be pruned. This can be done with a small grinder or a hacksaw for metal.


