


Expand the space of the apartment can be due to the conversion of the balcony or balcony. Having installed a warm floor, you can arrange a functional space, regardless of the time of the year. This article details the types and installation of a warm floor for a balcony or a loggia.
Content
For what it is necessary to warm a balcony or a loggia
A balcony or loggia in an apartment is always an extra space that each owner uses in his own way. But, basically, the period of practical operation of additional square meters is limited by the warm season. With the onset of autumn, the "balcony" season closes until spring. Properly warming the balcony and making it heated, you can get a useful heated area at any time of the year.
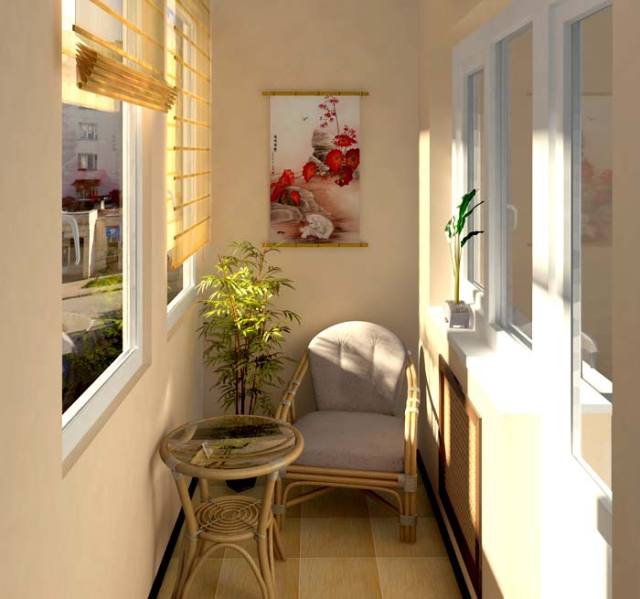
In this case, you can not only store things, but rest or work, regardless of the snow outside the window, or rain. At the same time, the insulated balcony will insulate and the adjoining room.
Undoubtedly, the insulation of the balcony is the right solution, because the role of the floor, walls and ceiling is played by concrete slabs, which are not very good heat insulators. In cold weather condensates collect on the plates, they freeze in the frosts and cool the wall of the apartment. After changing the insulating glass unit, the balcony must be insulated from the floor.
Although, some masters do otherwise, it is better to do before the walls are insulated because the level of the balcony after repair will rise and the consumption of materials on the walls will decrease. The choice of the method of warming depends on the wishes of the owner, on the condition of the balcony itself and on how, in consequence, the updated space will be used.
The best solution for the insulation of a balcony or a loggia is the installation of an electric warm floor. The advantage of this method is that the heating of the balcony room occurs directly from the floor. This creates a more uniform heating of the entire space, in contrast to the radiators when the floor remains cold.
What type of electric floor heating choose
Insulate the floor of the balcony with your own hands is quite simple. Warm floors of electric type are easily installed and do not require any special professional knowledge in construction.
Electric warm floors are:
- With thermal electric cable
- On the basis of thermal mats (thermo-mats) - the system "warm floor"
- Infrared warm floor
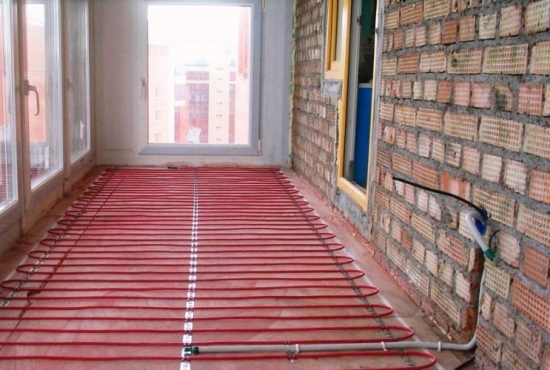
In an electric field on the basis of a cable, the heat-bearing element is a cable in the form of cable sections (single- and double-core). It is the source of heat and heats the materials when an electric current passes through it. The cable system is very efficient, but requires a concrete screed. This makes the work quite laborious, and in some cases impossible, if the slab of the balcony is not designed for such an additional load. In addition, under the cable sections a layer of thermal insulation is laid.

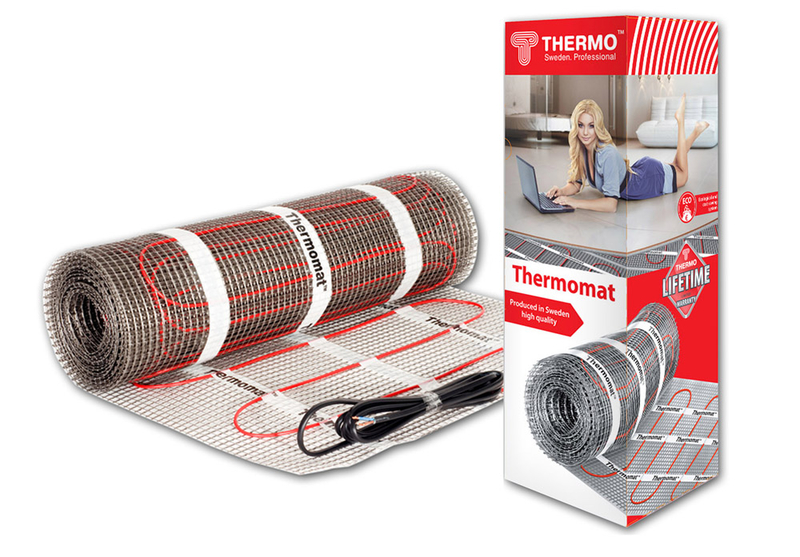
In thermal mats, the cable is built directly into the reinforcing mesh. This material is produced in rolls. This design is somewhat more expensive, but simplifies the installation work - just deploy the mats and lay on the floor. The efficiency of the heating mats is somewhat lower than the cable sections, but they can be laid without screed. Heat mats can be spread on a concrete base, or under the finish coat on an old tile.
Both the cable and thermal mats are poured either with a screed or with glue. A completely different solution is the infrared warm floor on the loggia. The price of such material is somewhat higher, the previous materials, but the cost of electricity is payback. Such a film is laid directly on the concrete screed, under the "clean" coating of the floor. This coating can be used for insulation, without making overhaul of the floor.

How to insulate the floor on the balcony with a heat cable
The installation of a warm floor on the loggia begins with the dismantling of the old floor covering. In this case, carefully clean the floor of small debris and dust.
Attention! The balcony is an originally open area, the balcony slab has a slope towards the street for draining rainwater and meltwater. This must be taken into account when insulating the floor.
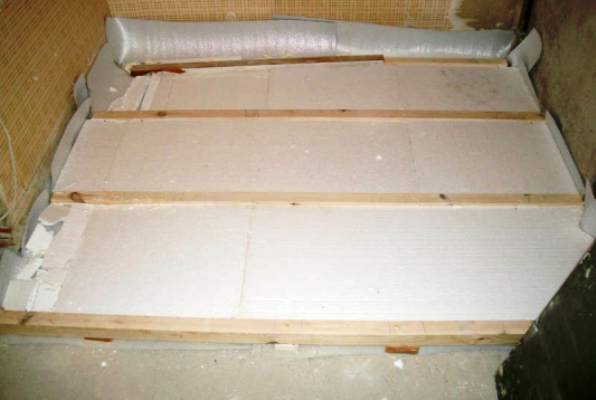
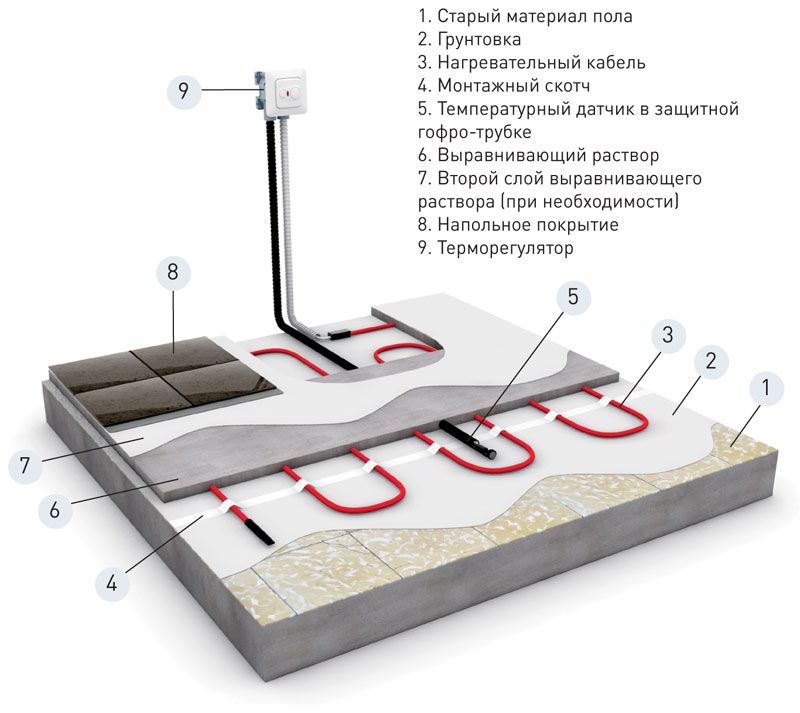
An important condition for creating a warm floor on the balcony is reliable hydro and thermal insulation. That is why at the beginning of the work on the balcony slab waterproofing is laid. This can be, for example, polyethylene film. Such a precautionary measure will helpprevent penetration of moisture to the heat insulator and impregnation with its condensate. Then, before the beginning of the insulation of the floor, you should always align the base. To do this, the rough (bottom) floor is used with a wooden crate trim. Between the bottom floor and the base of the plate, a layer of heat-insulating material must be laid, this is necessary to preserve the heat coming from the heating cable. The rough floor rises to a certain height. The higher the crate, the thicker the layer of insulation can be. To determine the height of the bottom floor, consider the following:
- The height of the floor level on the balcony, compared to the level in the apartment room is no more than 15 cm.
- The height of the balcony is from 2.5 m.
- The height of the fencing of the loggia and the balcony is from 1 m.
If small children live in the apartment, then the height of the fence according to the required standards is 1.5 m. In case of emergency, the protective fence can be increased to the required height.
On the installed film waterproofing across the balcony is installed wooden beams. The distance between them is one and a half meters, the beams are fastened to the concrete slab by anchors. It should be noted that the adjustment of the floor level is performed by longitudinal bars - lags.
On a standard balcony, three lags are needed. They must be laid on the transverse bars and fixed with screws. First, the highest lag is selected, then the remaining lags are leveled by its level, wedges are inserted between the lags and the transverse wedges.
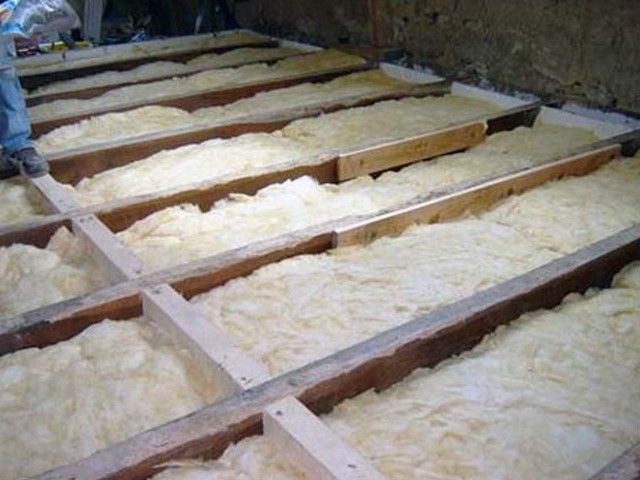
At the next stage the space between the crate of wooden beams is filled with the chosen insulation. As materials for insulation can be used:
- Penoplex (extruded polystyrene foam)
- Styrofoam
- Mineral wool

Penoplex is a light, durable and durable material from a series of foams. Plates of expanded polystyrene or extruded polystyrene are easily cut with a knife. Such material has excellent thermal insulation properties, while it is resistant to moisture and environmentally safe. At the same time, foam foam is considered to be a warmer material, in comparison with a foam plastic.
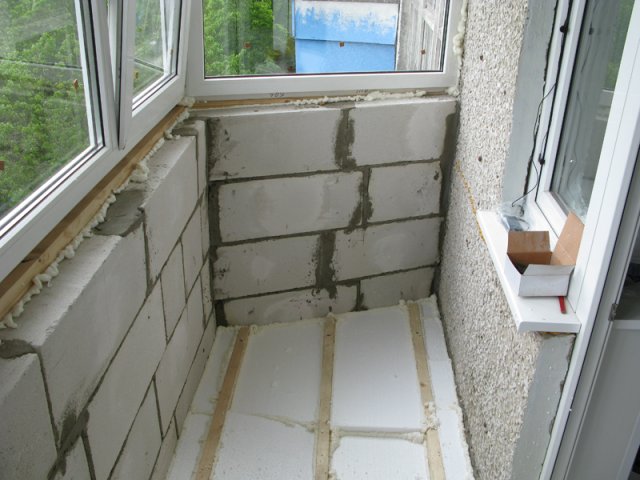
Polyfoam is, in fact, the most common material for floor insulation. Polyfoam is cheaper than other heaters, practical and easy to install.
Attention! Some varieties of foam are not fire resistant. To insulate the balcony you should buy a fireproof foam.
Mineral wool strongly imbues moisture, so for such a material will have to arrange a fairly serious hydro and vapor barrier. In the opposite case, the mineral wool will always be moist, and a water-insulated heater can not perform its direct function of creating a heat barrier. Accumulated moisture in the heater will reduce the practical properties of the entire floor structure.
After laying the heater in the crate, the logs are laid and fixed on the logs. All the seams between the sheets of chipboard, as well as the cracks between the sheets and walls are embedded with construction foam. The installation of the rough floor is finished. The stage of laying the heat cable begins.
Before installing the cable, you must select the location of the thermostat and knock out a hole in the wall for the installation box. The thermostat is located at a height of 50-100 cm. For the normal operation of the entire system, a floor sensor is required. The sensor is placed in a tube of corrugated plastic, this is necessary for the case when the replacement of the device is required. Before laying the cable, the power cables are connected to the thermostat box, and the coupling must always be directly in the concrete screed.
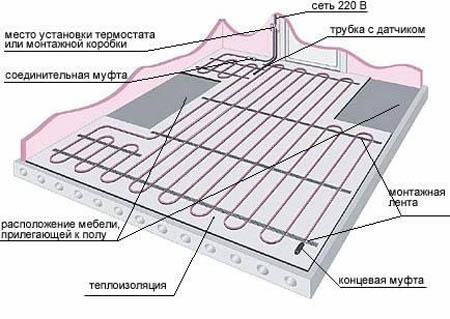
For reliable fixation of the heat cable, the mounting tape is fixed on the chipboard layer. The cable is fixed with specially designed clamps, which allow you to observe the necessary step between the cable turns. Usually the cable is mounted with a "snake". The laying distance is the distance between the windings of the snake. It is necessary to calculate the pitch of the cable correctly. If the step is too shallow, the cable consumption will be overestimated, with a large step the effect of heating may not be sufficient, and the floor will consist of warm and cold strips.
Attention! The thermal cable must never touch or cross between each other.
After completion of the work on laying the cable turns, a temperature sensor of the floor is installed and an operational test of the system is performed. All system parameters must correspond to the data specified in the cable documentation. It is necessary to check the operation of all devices and the correct installation - after the screed is flooded, it is practically impossible to correct the errors without losses.
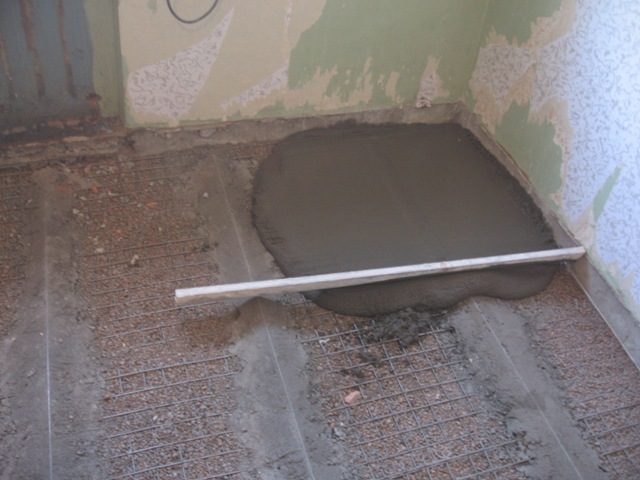
Now you need to fill the floor screed. Its thickness is 5 cm. This is the most optimal parameter. A finer screed can burst, and a thicker layer is too heavy for a balcony slab. When pouring such a screed, metal mesh reinforcement is not used to avoid its influence on the operation of the electric cable. In the coupler, emptiness and unevenness are unacceptable, this will affect the work of the warm floor, which will lead to overheating of the system and rapid failure of it.
Screed completely freezes for five days. At this time, you can not turn on the heating system. After that, they begin to install a finishing floor covering. Such material can be any, perhaps, excluding parquet, from continuous heating it is cracked. For good system performance, you should choose a coating that conducts heat well. The optimal solution is tile, while laminate, linoleum or carpet are heat insulators.
Thermomats. How to make a warm floor on a loggia without ties
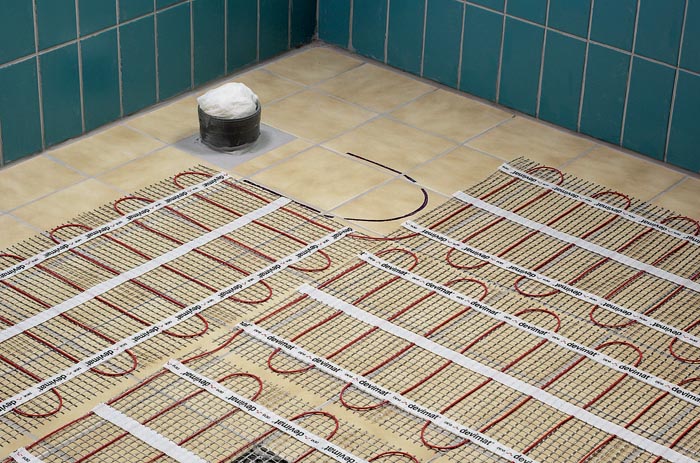
Thermometers are a heating cable, which is initially fixed on a fiberglass thermally stable grid. Such coating is produced in rolls, their width is one meter, it is very convenient to make heated floor electric on the loggia or a balcony.
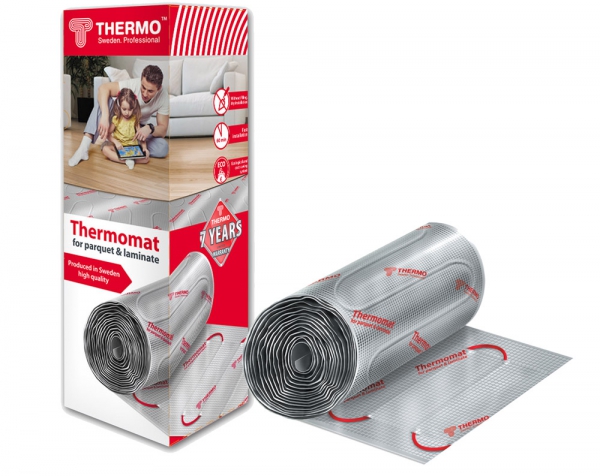
The main advantage of thermo-mats is their installation. They are laid on the rough concrete floor and fixed with a glue mixture, which is used for tile. This is the best option in the event that the insulation is made for granite tiles or tiles.
Infrared warm floor on the balcony. Heating film
As a heating element in the infrared field, not a cable but a special heating film is involved, with a thickness of about 0.5 mm. Such a warm floor can be installed in two hours. The film is produced in rolls and does not require the use of glue mixtures during installation.
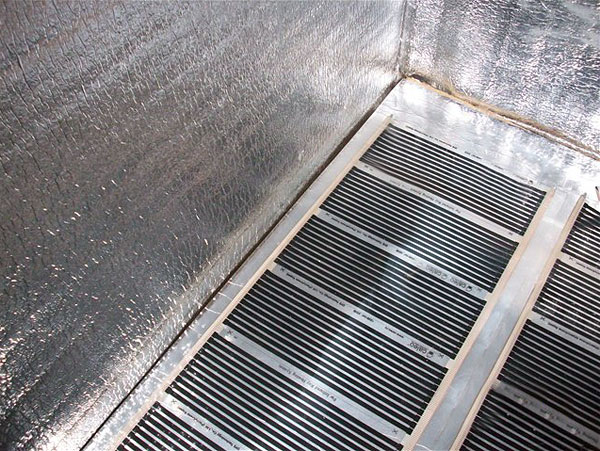
The basic principle of the operation of such a floor in the radiation of infrared heat rays. This is an environmentally friendly, ordinary thermal radiation, it should not be confused with electromagnetic waves. Inside the thin layer of heat film, the entire heating system is sealed: two copper conductors run along the edge, which are connected to the network, and the bands of the carbon conductor are fixed between them. All contacts are securely protected by elements with silver plating.
Immediately after laying the infrared floor, you can start using it. The heating film is very well combined with flooring such as laminate or linoleum. However, here there is one nuance: the infrared floor is not mounted in places where furniture will stand, as there is a possibility of damage to the thermal layer.
Installation of a warm floor on a loggia or a balcony with your own hands is quite simple. Equipment for any type of underfloor heating is accompanied by detailed instructions for proper installation and operation.


