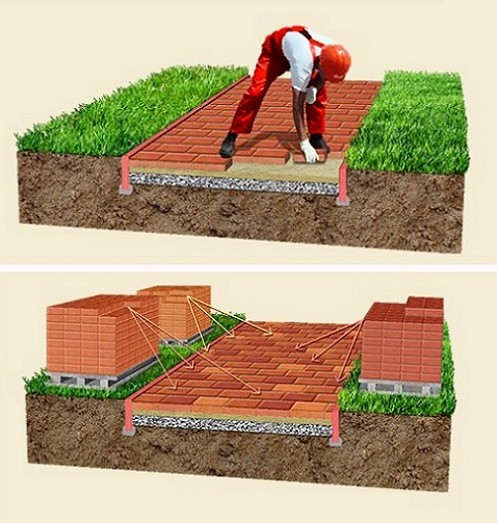
It is known that paving slabs are an excellent material for access roads and garden paths. Of all the previously used coatings of concrete and bulk material, the tile is the most durable and attractive. The original shape, noble color scale and simple linear layout allows you to create the necessary sidewalks on the site of a private house.
Content
- 1 Basic styling technology - what to do
- 2 Step-by-step instruction for laying paving slabs
- 2.1 calculation of the thickness of the tile
- 2.2 choose the method of laying
- 2.3 Step 1 Preparatory work and site planning
- 2.4 Step 2 The device of drainage, slopes and carrier layer
- 2.5 Step 3 Installation of curb stone and creation of an underlayer
- 2.6 Step 4 Alignment of the Underlayer
- 2.7 Step 5 Laying the tiles on the markings
- 2.8 Step 6 Filling the interlacing seams
There is an opinion that the technology of laying is available only to professional tilers, who know all the secrets and subtleties of technology. Useful tips will never interfere with your work, especially if you follow the specifics of the basic technology.
Basic styling technology - what to do
The hand laying of paving slabs is a labor-intensive exercise, requiring an integrated approach for carrying out work and observing the rules for laying tiles.
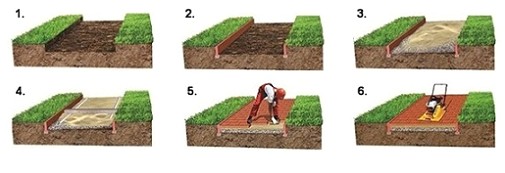
The complexity of piling will be associated with excavation and leveling work on the carrier layer, which involves the following steps:
- choice of way of laying tiles and drawing of the sidewalk
- preparatory work and site planning
- device of drainage and inclines
- creation of a bulk carrier layer
- curbing
- alignment layer device
- laying tiles according to the marked pattern
- sand filling of interlacing seams.

With respect to the basic technology, a step-by-step instruction allows you to correctly tile the tile, chosen according to the general color scheme of the building, plot and garage.
At the initial stage of choosing the method of laying and drawing the future sidewalk or footpath, it is necessary to calculate the load on the surface area.
Step-by-step instruction for laying paving slabs
calculation of the thickness of the tile
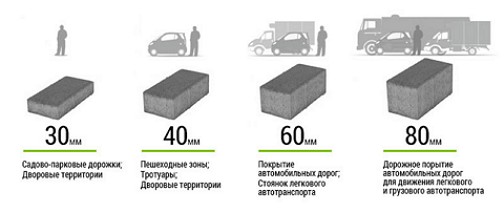
Let's suggest that the thickness of the paving slab, whose types are intended for pedestrian and automobile pavement sites, are different. The industry produces vibropressed and stamped tiles for the sidewalk. Vibropressed tiles, from the practice of use, more dense in structure and durable, which provides a long service life and, accordingly, a high price.
Tiles are sold at a rate of 1 square meter, so in order to buy a batch of tiles for the linear scheme of laying to the calculated area add 20%. If you plan to diagonally lay the sidewalk, then the paving area is multiplied by 30%.
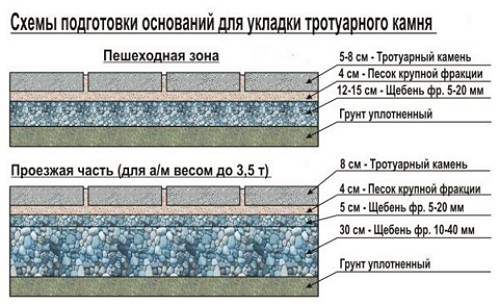
So, to enter the garage and the tracks for the machine, the recommended thickness of the paving slab is 300x300 mm with a stabilized soil and a concrete base of 6 cm.
For pedestrian sidewalks, the thickness of the paving slab paving 300x300 mm is possible up to 3-5 cm.
choose the method of laying
The way of laying the tile depends on the purpose of the sidewalk. Let's say laying on a sand cushion is the easiest and most economical way for tiles of small and medium size. Laying tiles of non-standard sizes on a concrete screed will require additional leveling.
Helpful Tips
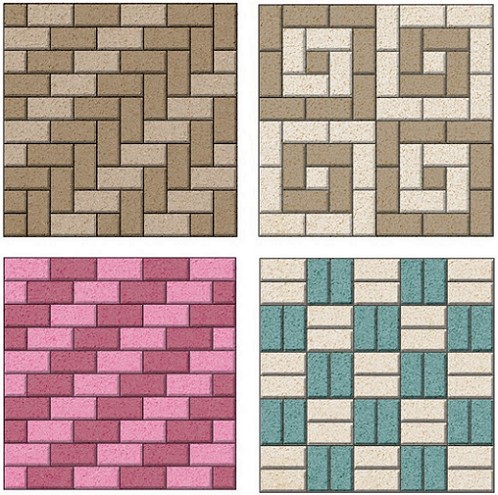
The range of vibro-pressed paving slabs is already limited by the strict geometric shapes of the square and rectangle. Today it is more practical and convenient for the stacker configuration in the form of cut corners of squares, in the form of waves or polygons with the possibility of selecting a design pattern. Pick up a picture of the sidewalk and create a linear scheme of laying is recommended by sketch, compiled on a paper sheet in a cage or grid in a graphics editor.
Step 1 Preparatory work and site planning
The preparation of the territory begins with the selection of the site and the breakdown of the contour with the establishment of control "beacons" in the traditional way. We mark the exact boundaries of the plot and mark the reference points on the ground, which determine the center of the tile. At this stage it is necessary to trace the symmetry of the paving pattern and to correct it.
Then, after removal of the level of heights, the upper fertile layer of the soil is removed and a deviation and drainage device is made, preparing the material for the device of the bearing (underlying) layer and the tool for laying the tiles.
Step 2 The device of drainage, slopes and carrier layer
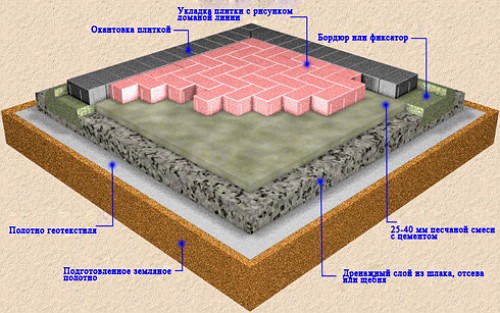
It must be remembered that any foundation under the paving slab is wetted and soaked with rainwater or drains. It is mandatory to create a load-bearing drainage waterproof layer of crushed stone of uniform granularity, screening, geotextiles and gravel.
After the completion of the preparatory work and marking, the ground is compacted and compacted, and then a layer of crushed stone is spread with the same thickness over the entire area. Expose the drainage guides and fix them. The thickness of the loaded pedestrian track is 15-20 cm. For the sidewalk of car parks and ramps, the thickness of the carrier layer reaches 30 cm. If necessary, 2-3 layers can be laid. Each layer is compacted with a vibrator for laying the tiles and watered.
Step 3 Installation of curb stone and creation of an underlayer
Installation of curbstone is mandatory. The number of curbs for the sidewalk is calculated along the perimeter of the site or the length of the tracks. The result of the footage is divided by the length of the border, obtaining the required number of plates for purchase. To install a curbstone prepare a lock, the curb itself is placed strictly vertically.
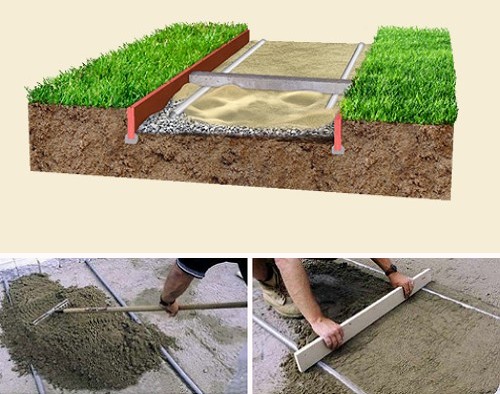
On the exposed guides and installed curbs, an underlying layer of pure sand without impurities 3-5 cm thick is laid on the carrier layer and spread evenly over the surface.
Step 4 Alignment of the Underlayer
Alignment of the underlying sand layer is carried out using the rule, leading it with both hands along the exposed guides along the entire plane of the sidewalk or track. After leveling the surfaces, the guides are gently removed, filling the remaining trail with the mixture.
Step 5 Laying the tiles on the markings
Tiles are laid on the sand-cement mixture in rows, so it is necessary to prepare the estimated number of tiles.
Before the start of laying the tiles, prepare the cement-sand mixture from the cement / sand ratio of 1: 6. It is recommended to moisten the sand well before application. It is recommended to prepare the cement-cement mix in small batches from the calculation of 1-2 rows, which are laid from themselves, moving the subsequent tiles along the laid row. For straightening and fitting tiles in place, use kiyanku.
Step 6 Filling the interlacing seams
The final stage of laying the tile of the sidewalk is the filling of interlacing joints with a cement-sand mixture, scattered on the surface. Then the mixture is gently swept into the interlace slots until the joint is completely filled.
The curb of the sidewalk surface is produced using a manual vibropress.
Useful tips on how to lay tiles on a concrete base are shown in the video.


