Modern man does not represent his existence without electrical energy. Over the past few decades, the number of electrical appliances has increased many times and only one and a half dozen different devices are in operation in the kitchen alone. Despite the fact that the designers are trying to make the technology more economical, the growth of its number has led to the fact that the consumption of electricity has increased significantly.
Content
Safety rules for electrical wiring
Voltage of the electrical network in our homes is deadly to humans, so all operations must be performed only when the power supply is disconnected. If there is a suspicion that the wires may be energized, then before the work is done, the probe or the tester should verify that it is not there.
During the use of electrical appliances operating from the power grid, and also when it is necessary to carry out measurements on wires that are under dangerous voltage, do not touch the grounded metal structures of the building, the pipes of water supply and heating.
When performing work, it is allowed to use only serviceable electrical outlets, transfers, lamps, hand and electric tools that have intact insulation.
Do not pull the plug from the electrical outlet by holding on to the wire. A short circuit and poor contact in the plug and socket may cause a fire.
All works related to the installation and operation of electrical wiring and electric consumers are carried out in accordance with the "Rules for the installation of electrical installations", abbreviated as "PUE". "Rules ..." determine the order of the wiring, the placement of various devices, etc. PUE, including, should be performed when carrying out work in apartments and private houses.
Wiring rules
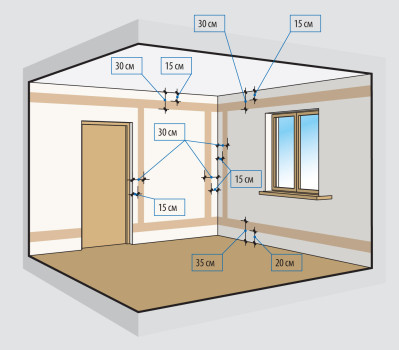
The rules for the installation of electrical wiring in the apartment require cables and wires to be laid on the walls strictly vertically or horizontally. Electrical wiring should not pass through rooms with high temperature and humidity. If necessary, the sockets in such rooms should be switched on via an RCD, a differential switch or galvanically isolated from the mains by a separating transformer installed outside these rooms.
Piped wires, sockets and switches must not be closer than 0.5 m from the gas stove and metal structures, such as water and gas pipes, radiators, etc. Electrical appliances with a large current consumption, such as an electric boiler, boiler, split system and some others are best connected to the shield by separate beams.
Locations of switches and sockets must be carefully thought out, so that the use of carry-overs can be avoided. It is strictly forbidden to close access to the input board. The number of outlets should be chosen with a margin, since in the future it usually turns out that their number is not enough. Install the sockets in any convenient place, but not more than 1 m from the floor. For switches this value is equal to 0.8-1.7 m. If before the switches were mounted as high as possible, recently they are often placed below. In addition, it is forbidden to install sockets in the toilet rooms. Switches are installed at the entrance door, from the side where the door handle is located, the wire to the switches must go down from the top.
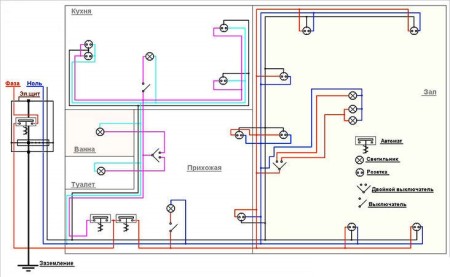
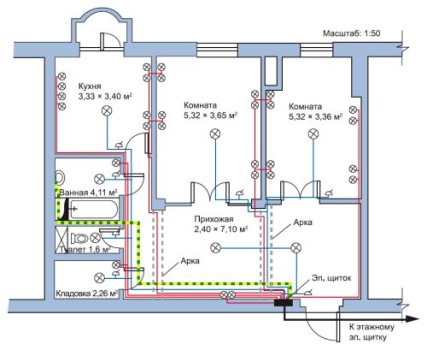
Example of a wiring diagram in an apartment
It is recommended to start wiring work with the layout of the power plan. It is worth using the plan of the apartment, executed in accordance with the scale, which will make it possible to accurately calculate the lengths of the wires to be laid out according to the drawings, choose the most optimal location and avoid mistakes during laying. There's no point in sticking to the type designations of the electrical wiring elements, the main thing is that you can understand the circuit yourself.
In order to carry out wiring layout, it is first necessary to represent the purpose of the rooms and the predicted power consumption of electrical appliances. This is required in order to calculate the cross-section of the wires and evenly distribute the load. The power supply diagram indicates all the elements of the power network: a switchboard, junction boxes, sockets, switches, lamps, as well as cables and wires connecting them.
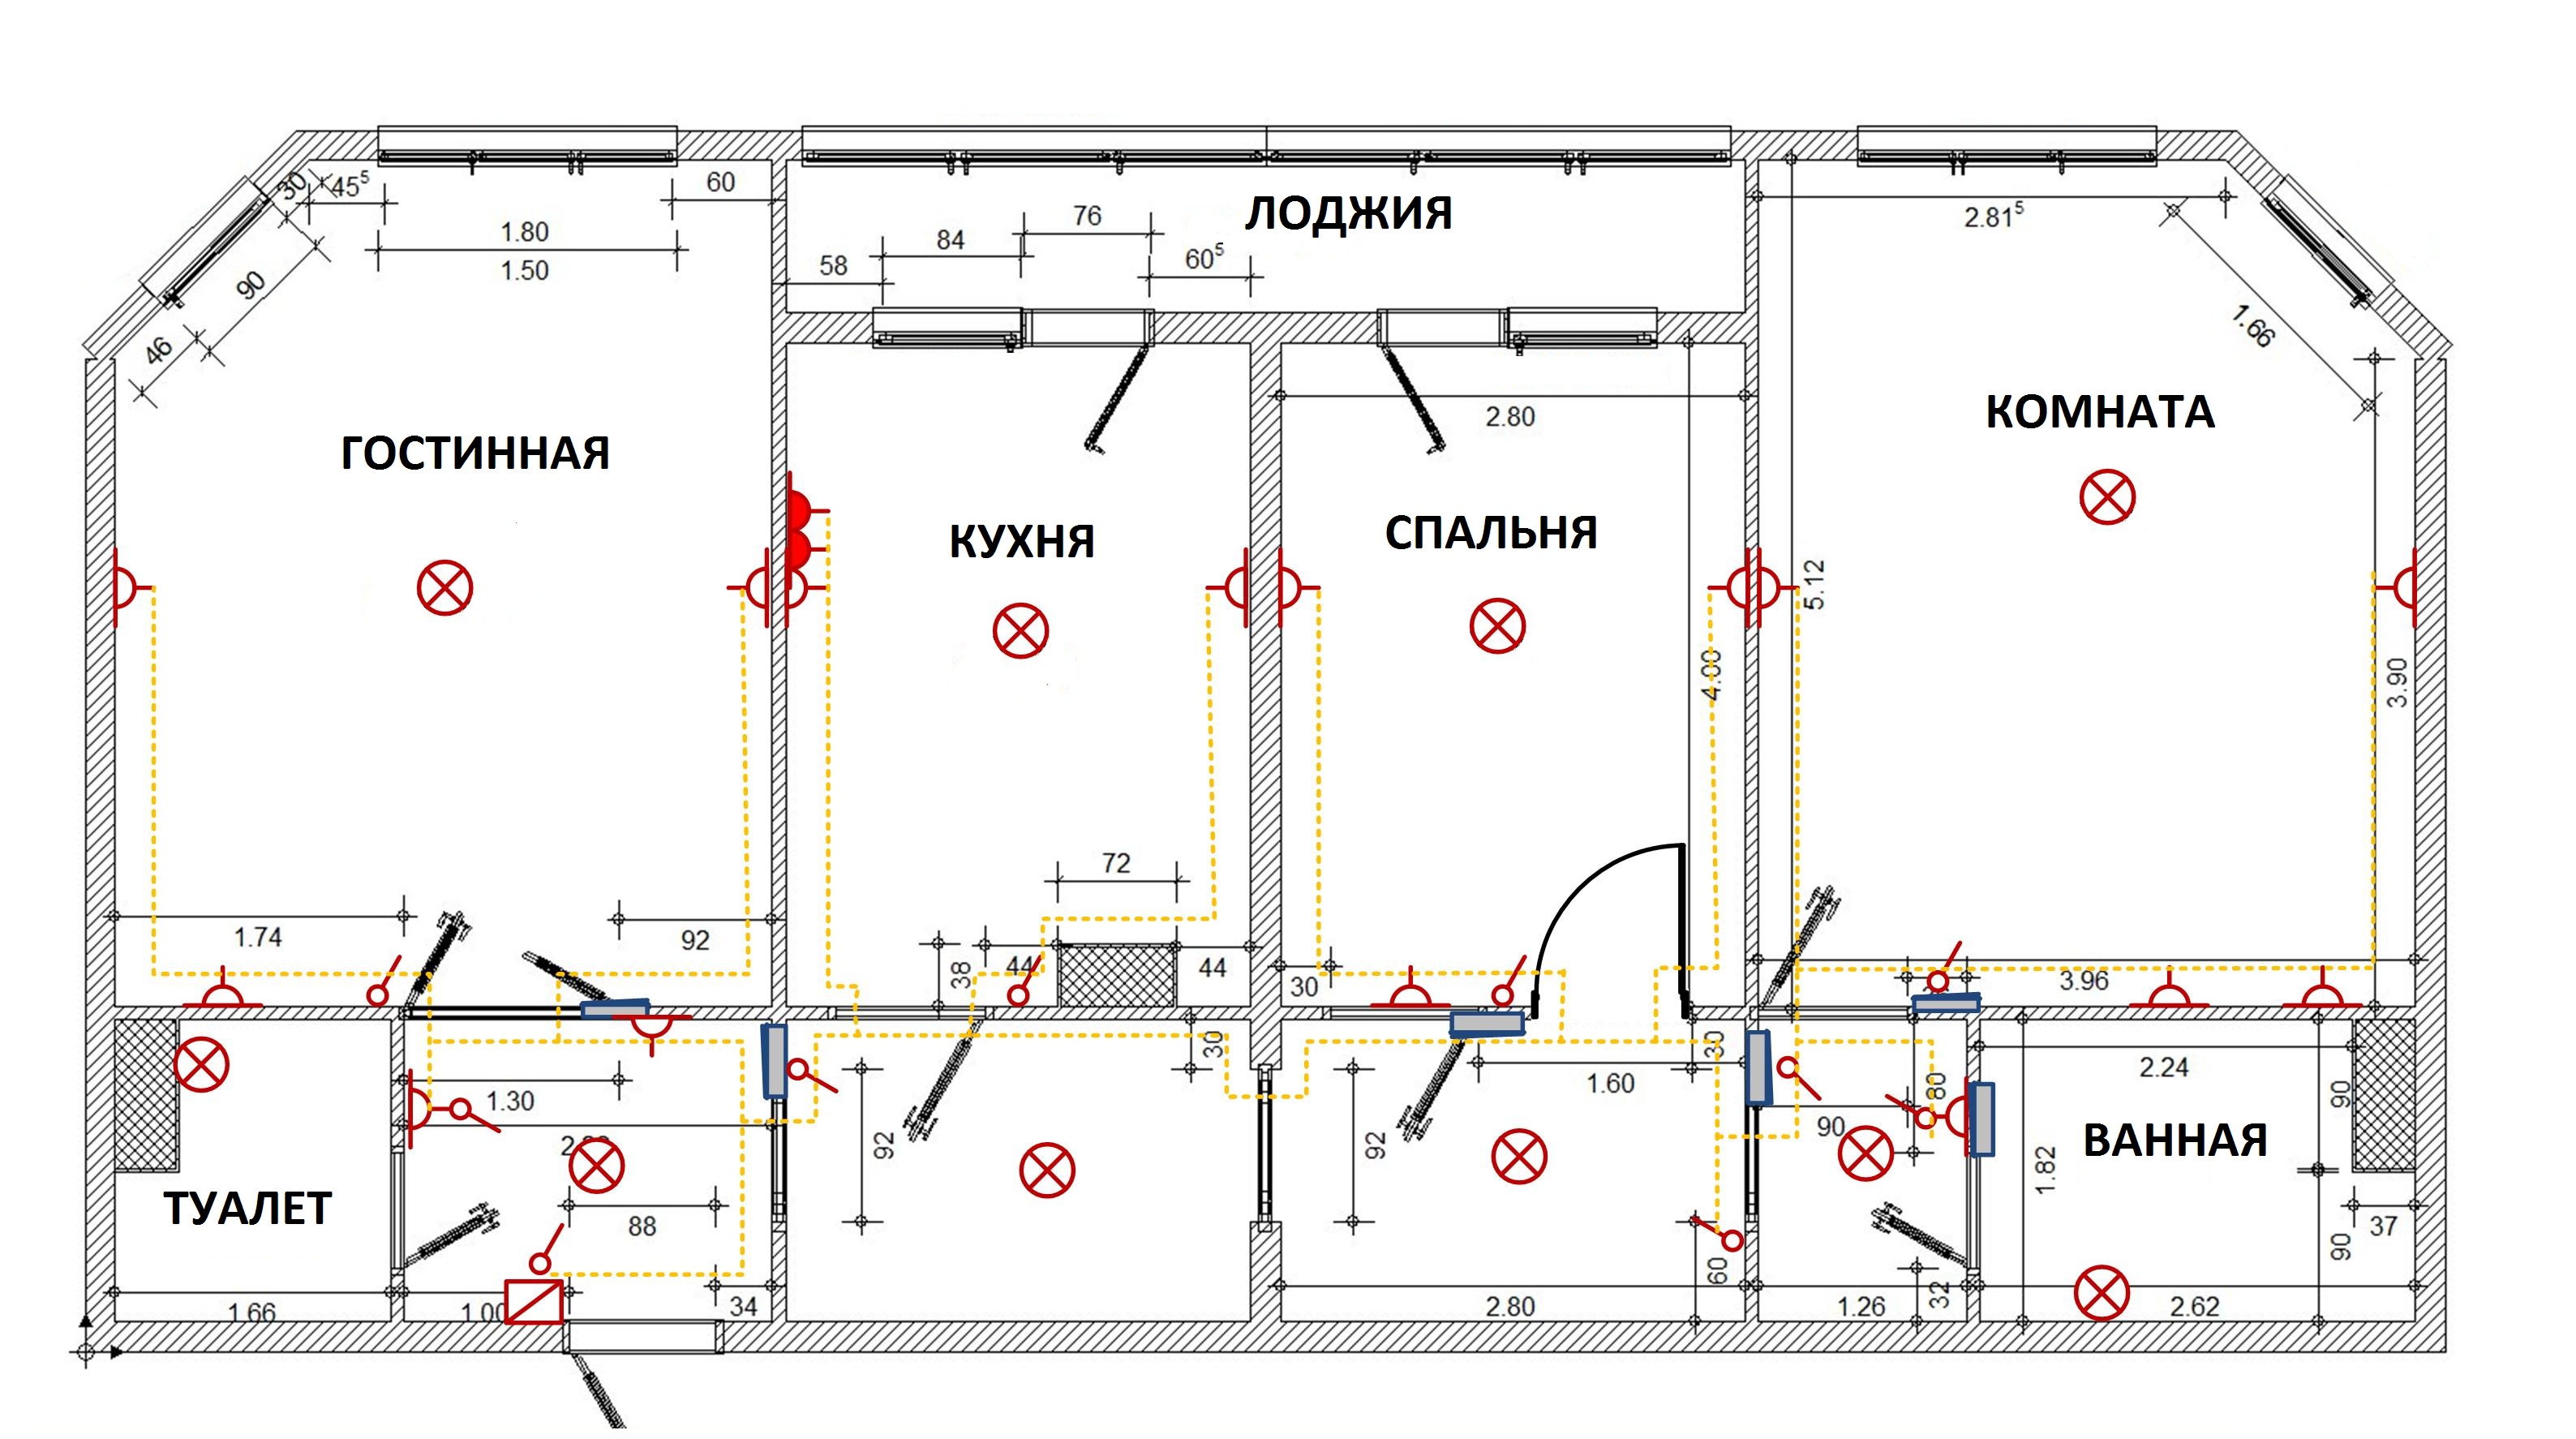
The most reliable is the switching circuit, when each socket and lamp are connected to the switchboard by a separate wire through an individual circuit breaker. In this case, if the wire breaks down, only one outlet or lamp will go out of power. With all the advantages of this scheme has a significant disadvantage: a large consumption of cable products and machines, increased dimensions of the switchboard.
In practice, depending on the power consumption, one or several rooms are connected to an individual automatic machine on a board by a separate cable. Distribution of power to these rooms, outlets and switches is carried out through junction boxes. In case of damage to the wire, only these rooms will be de-energized, but not the entire apartment. The advantage of such a scheme is to reduce the cost of cables and wires.
Experienced experts recommend fixing the distances from all wires and junction boxes to window and door openings, corners and other landmarks on the circuits, then later, when drilling holes for shelves and hanging cabinets or performing repairs, you can avoid accidental damage to the wiring.
Materials used
cable products used for wiring
In Soviet times, aluminum was used most often as an electrical wiring material in apartments. aluminum is much cheaper than copper, and its weight is more than three times less. At the same time, with the same cross section, copper wiring can withstand much higher loads, and its service life is twice as long. Aluminum wiring is softer, often breaks down on bends, wears out over time, the physical properties of the metal change.
Faulty wiring is often the cause of fires, and fires are more likely to occur where the wiring is made of aluminum. That is why the PUE prescribe in the residential premises to use copper as a material for electrical wiring.
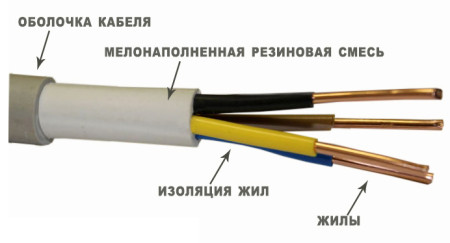
The apartments use a variety of types of cables and wires. Consumers in the ratio of price / quality often choose a copper power cable VVG (vinyl-vinyl-naked). Each of its veins has its own insulation, and all the wires are placed in a PVC jacket.
There are various modifications of VVG cable, differing from each other in the design and insulation material: VVG, VVGp, VVGng, VVGng, etc. The marking "p" means that the cable is flat, "ng" - cable insulation does not support combustion, and "ngd" in addition, it has a low level of smoke evolution. The full name of the cable has the following form: VVG 1х1.5, ВВГ 2х2.5, ВВГ 3х4, ВВГнг 4х6, etc. The first number in the marking means the number of cores, the second - the section of the vein (mm). There are also variants of a cable having veins of different cross-sections, for example, VVG 3x4 + 1x2.5, i.e. The cable has three wires with a cross section of 4 mm and one wire with a cross section of 2.5 mm2.
No less demand uses wire NYM, manufactured by the German standard. NYM in its parameters is similar to VVG, but its cost is higher, as it has additional insulation with improved characteristics.
Both the VVG wire and the NYM wire have a standard color marking of the cores, which simplifies the cutting.
color coding of electrical wires
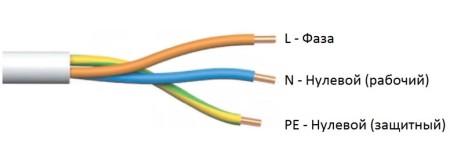
In order to quickly and unmistakably make the wiring, manufacturers of modern electrical products use color or other marking. In an electrical cable, each of the wires has its own purpose and its color.
Different manufacturers can use their color coding of wires, however, most often the following color combination is encountered:
- Zero working wire - blue;
- neutral protective conductor (grounding) - yellow and green stripes along the entire length of the wire;
- phase wire - the remaining color.
wire section selection
The cross-section of wires depends on the power consumption of electric consumers. The more power - the bigger diameter should have the wire. To select the cross-section of the wire, it is necessary to summarize the power of all electrical appliances that can be simultaneously switched on by this cable. There is no need to lay cables of the same cross-section throughout the apartment: if there are rooms that do not plan to use powerful electrical appliances (for example, a closet, a toilet), then it's better to have thinner wires that cost less.
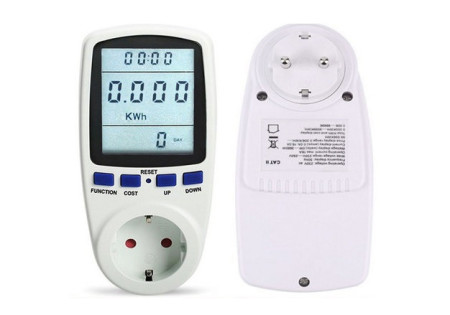
To learn the consumption of electrical appliances is not difficult. The power must be indicated in the passport or in the operating instructions, it can also be found on the label or nameplate placed on the device. Power can also be determined using portable meters that can display instantaneous power and current, the operating time of the appliance and the power consumed during this period.
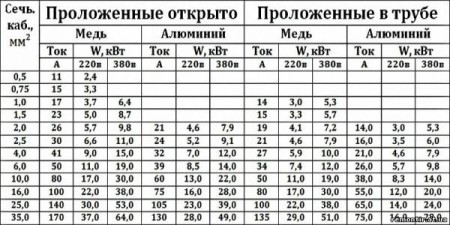
Knowing the power consumption, you can use the table to calculate the required cross-section of the wires. Values will be slightly different for open and hidden wiring, since wires laid openly heat less, giving heat to the surrounding space.
It is difficult to predict how the technology will develop in the future and what new electrical appliances can appear in our homes, therefore, in calculations it is necessary to take into account the power reserve.
Wiring work
Before starting work, place the passage of electrical wiring, installation of electrical fittings and lamps should be marked with a pencil or chalk.
installation of concealed wiring
If the walls in the apartment are not plastered, then cables and wires are attached to them according to the predetermined marking, using special wiring brackets, which can have different designs, sizes and ways of attaching to the wall. The staples can be cut using a special perforated tape.
Fastening of staples to brick walls is carried out with the help of nails entering into their kit, to concrete ones - self-tapping screws with dowels in pre-drilled holes. The distance between the staples is selected in such a way that the wiring does not sag and as much as possible is pressed against the wall. When passing the corner of the room, the cable must be fixed as close as possible to the corner.
The depth of the sprout is much larger than the thickness of the plaster. Using a perforator with a nozzle, a blind hole is drilled to a depth such that when the drill is inserted into it, the hole does not protrude beyond the layer of the plaster.
Similarly, a switchboard (if it is not a delivery note) and junction boxes is installed. After applying the plaster, the electrical wiring, junction boxes and podrozetniki will be immured under its layer.
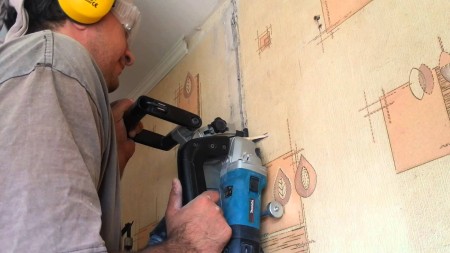
For the installation of concealed wiring in walls with plastering, you will need to make a channel for the wire-rod. For ease of operation, an electric shroud is used, which allows a more even and uniform channel to be obtained. In addition, it can be connected to a vacuum cleaner, thereby reducing the amount of dust.
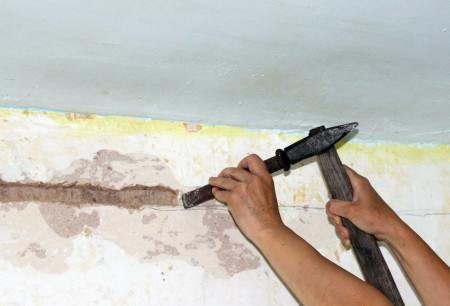
Shtruborez is a specific tool, therefore in its absence it is possible to use an angular grinder, a perforator with a nozzle-shtroborezom, and for small amounts of work - a hammer with a chisel.
The advantage of hidden wiring is its aesthetics, it does not catch sight. At the same time, with this method of laying it is impossible to lay an additional or replace a damaged wire or cable without breaking the surface, unless the wiring is laid inside the pipes. In addition, when plastering the plaster for concealed wiring, a very large amount of dust is formed.
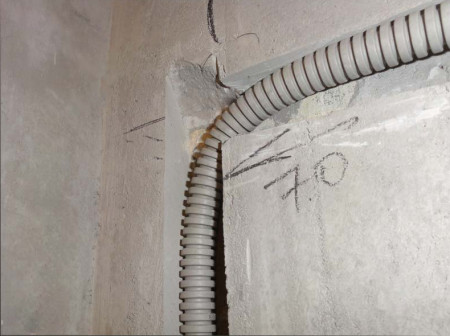
To be able to replace or lay additional wires under the plaster, the wiring is placed in the corrugated pipe. Inside the corrugation is left the so-called workpiece (a piece of thin steel wire). If necessary, a new electric wire is attached to the workpiece and, pulling the workpiece, this wire is tightened inside the pipe. In order to keep the possibility of repairing the wiring in the future, together with the electric wire, it is necessary to tighten the new workpiece.
installation of open wiring
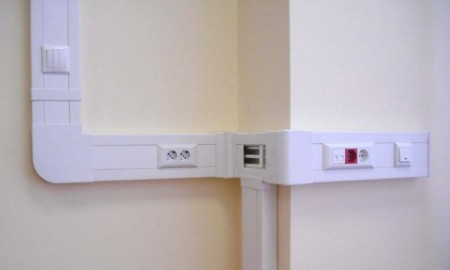
Open wiring can be laid in plastic cable boxes (cable channels), corrugated pipes, placed on insulators or fixed using special staples, etc. Open wiring is more suitable for industrial, office and some household premises, as it is less aesthetic.
installation of ceiling lighting fixtures
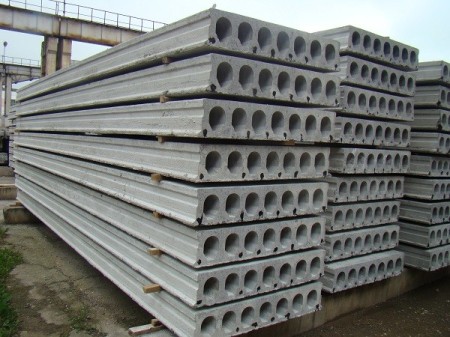
Lighting of premises is carried out by fixtures which settle down, as a rule, in the center of a ceiling. Reinforced concrete slabs, which form the ceiling, are full and hollow.
Works on concrete are the most laborious. With the help of shtroboreza or perforator with a nozzle in the slab overlapping stroba, which is then laid and sealed wires. In the absence of a special tool for shtrobleniya, you can drill holes through the path of the wire passing close to each other with a drill with a winning tip.
The depth of the holes should not be less than the diameter of the wire being laid. The bridges between the holes are hammered together with a chisel, the wire is laid in the received shtroba and covered with alabaster. If the alabaster does not hold on to concrete, when preparing the mixture instead of water, it is better to use PVA glue
The hollow core slab contains inside the void, which is convenient to use for laying wires. The voids in the plate can be found by drilling holes in the plate at its joint with the wall and in the planned installation place of the lamp. The holes must fall into the same void.
The holes found expand with a larger diameter drill, and in one of them a thin wire with an attached electric wire is laid as a workpiece. Through the opposite hole with a wire hook, a workpiece is extracted, by means of which the wire for the luminaire is then tightened.
installation of switchboard and electrical accessories
According to the method of mounting on the wall, the switchboard can be overhead (hinged) or built-in. The first option is less laborious, since there is no need to deepen the shield and is used in the case where the walls in the apartment are made of concrete. If the owner of the apartment does not want the switchboard to catch the eye, then for its installation it will be necessary to prepare a niche of the appropriate size and depth in the wall using a perforator.
After installing all the shield elements on the DIN-rail, they are connected together by jumpers from the lengths of the wire. The cross section of the jumpers must correspond to the current that flows in the circuit, and the colors of the insulation of the wires are selected in accordance with the color marking. All the internal installation of the shield is conveniently carried out on the table, before installing the shield on the wall.
When installing the shield on the wall in the openings of the box, it is necessary to start the cables, fix the shield and then perform the cutting and connecting the wires. Particular attention must be paid to ensure that the lead-in cable is not energized.
The purpose of the junction box is to distribute the supply voltage to consumers: to sockets, lamps and switches. In addition, junction boxes help save the wire, and the desire to reduce the number of boxes will necessarily lead to an increase in the consumption of cable products. In case of repair of the wiring, the box should be as accessible as possible.
Boxes can be internal and external. In apartments with plastered walls, the distribution boxes are hidden, for which a hole or a groove is prepared in the wall by a perforator, where it will become. To the wall the junction box is fastened with a screwdriver with a dowel. When decorating walls with plasterboard, an opening is cut into it, into which the box is fastened.
A box is installed on each room, and with a large number of outlets and fixtures in the room, boxes can be larger.
With a large number of cables it is recommended to sign the purpose of each wire that is put into the box. The wiring is made by any of the permitted methods, which are given below. Places of connection are necessarily isolated. Insulation tape, shrink tube is used for insulation.
If any switching is required during the operation of the junction box, then the old wire junction will be cut off by wire cutters, thereby reducing the length of the wires. Therefore, during initial installation, it is necessary to leave a sufficient supply of wires. A slightly smaller stock should also be in the sockets to install sockets and switches.
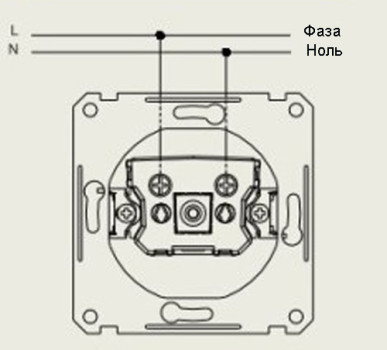
When installing the outlet without grounding, there is no difference where and which of the two wires to connect to the outlet.
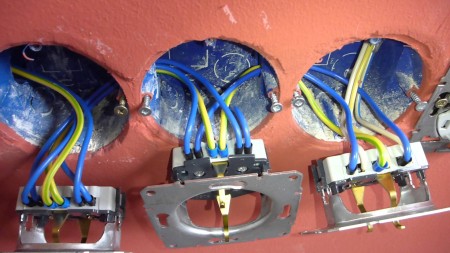
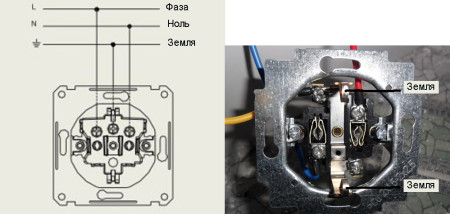
A socket with grounding requires care when connecting. A grounding wire marked with a yellow and green strip must only be connected to the center terminal of the spring plate that makes contact with the grounding elements of the electrical plug. An error in the connection may lead to dangerous voltage on the housing of electrical appliances. The order of connection of the remaining two wires does not matter.
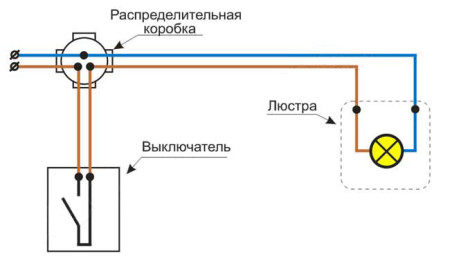
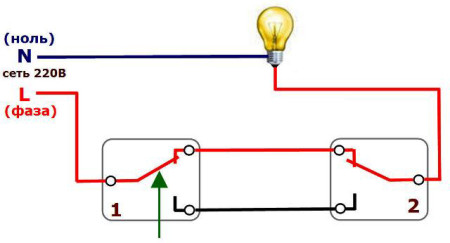
To ensure that the wires connected to the luminaire are not energized when the light switch is off, it is necessary that the neutral wire goes from the junction box to the luminaire. The phase wire from the box must come first to the light switch, and from it to the luminaire.
wire connection method
Weak electrical wiring - wire connections and screw connections on sockets and switches. Due to poor contact at the junction, heating and burning of the conductors may occur. The PUE provides the following connection options:
- welding machine welding;
- soldering with a soldering iron or torch using solder and neutral flux;
- pressing into sleeves with a hand press or ticks;
- screw terminals;
- self-clamping spring terminals (for example, WAGO and the like);
- quick-clamping spring terminals;
- connecting insulating clamps.
So far, the apartments in working condition is an aluminum wiring with twists, laid forty-fifty years ago. Modern rules prohibit the use of conventional twists without propayka or welding. Copper conductors are very well soldered, and propayat twisting wires with a powerful soldering iron is not difficult.
Screw connections due to the heating of wires with time weaken, therefore approximately once a year it is recommended to tighten them. Spring connectors do not need maintenance, since the springs are constantly pressing the wires.
Examples of electrical wiring in the apartment
Wiring layout in one-room apartment
Wiring layout in a two-room apartment
Peculiarities of wiring
wiring in the hallway
Wiring to the apartment is made from the entrance, so in the old apartments in the corridor there was a shield with an electric meter and plugs, and in new ones a distribution board with a counter, automatic switches, automatic protection devices, etc. is most often installed. From the shields, the cables and wires of the wiring distribute rays throughout the apartment.
Typically, anterooms are not cluttered with electrical appliances in the same way as other rooms. Most often from powerful consumers only the vacuum cleaner is turned on, for which it is necessary to install the sockets in convenient places. Often, the owners of apartments to ensure security install video intercoms and video eyes. These devices require power supply, therefore, an outlet must be provided at the entrance door at the place where the monitor is installed. To completely hide the wires that approach the monitor, when wiring is done, it is necessary to lay the electric wire from the switchboard into the wall.
If the apartment has a long corridor, then great inconvenience delivers the inclusion and deenergizing of lighting. To make this process more comfortable, it is recommended to install through-pass switches at different ends of the room. They allow you to switch the lighting on and off with one switch regardless of the position of the second switch. The disadvantage is that such devices are not in high demand and on sale there may not be a passing switch of the required design.
wiring in the room
The power supply of the living room in the apartment is best done by a separate beam. If you intend to use in the premises of electric appliances of low power, it is possible to supply several rooms from one beam. When installing a split system in the room, which has a significant current consumption, its connection should be made by a separate wire to the individual circuit breaker of the switchboard.
In the area where the computer desk is installed, it is recommended that you install one or two socket blocks with a total of 6-8 pieces, so that you do not need to use an extension cord to connect peripherals: printer, active speakers, Wi-Fi router, etc.
In the room, a satellite receiver, a cable television receiver and DVB-T2, a smart set-top box are often installed with the TV, so you should not limit yourself to one outlet, but mount the unit by the number of used equipment. When installing the TV on the wall, the sockets behind the TV panel will not catch your eye and spoil the appearance of the room.
To illuminate a glazed balcony or loggia, one or more luminaires are installed, connected to the junction box in the room. The switch for lighting control is more convenient to install indoors at the entrance door.
electrical wiring in the bedroom
In the bedroom there are usually one or two beds, bedside tables, a closet or usual cupboards. Places of installation of sockets and switches should be chosen in such a way that they do not appear to be enclosed cabinets.
Experience shows that each of the bedside tables needs a block of 2-3 outlets, the same unit for a TV set. In the bedroom, the TV usually looks lying, so the most convenient place for him is at an altitude of 1.2-1.5 m. Next to the mount it is necessary to install the sockets, so that the TV hides them and the power cord with its casing.
The bedroom lighting is most often provided by a ceiling lamp and table lamps or sconces. The ceiling light is supplied as standard: from the junction box through the switch. In case the cabinets do not allow you to install a switch in the room, it can be taken out of the bedroom, in front of the entrance door. The lamp-sconces have a different design: they can be plugged into a socket and controlled using a switch mounted in a luminaire, or connected to a junction box via a standard light switch.
The first method is simpler and cheaper, does not require additional wiring, only a free outlet is needed. In this case, the cord from the outlet to the lamp slightly spoils the appearance and requires a separate outlet for the lamp. In the second case, the electrical wiring is hidden under plaster or plasterboard, but separate switches are required.
electrical wiring in the kitchen
In the kitchen there is a large number of electrical appliances with a significant total capacity, therefore it is recommended to connect the room only with a separate beam with electrical protection using an RCD or a differential switch. Wire cross-section must correspond to the power consumption.
Unlike other premises, household appliances and kitchen furniture are bought for a long time, the working wall is faced with tiles, therefore it is very difficult to make any changes to the wiring diagram after the end of work. Hanging cords from household appliances strongly spoil the look of any room. Some electrical appliances on the contrary, have a short length, which should be taken into account when choosing the location of outlets.
The TV has become an indispensable attribute of the kitchen and because of the workload of the room, furniture and appliances are most often attached to the wall using a bracket. The socket block must be placed next to the bracket. Along with the electric wire on the sockets, it is desirable to lay a coaxial television cable.
Another kitchen electrical appliance, for which a connection in a non-standard place is required - a kitchen hood. The socket for it should be raised 10-15 cm from the top level of the hanging cabinet, and the supply cord should be placed behind the air duct. In the case of using a kitchen air cleaner, a convenient place for the outlet - just above the filter casing. An electric oven and a dishwasher are most often located below the countertop level, there it is worth choosing a place for outlets.
The kitchen like no other room needs good lighting. Often, in addition to the usual ceiling lamp on the cornice of suspended kitchen cabinets, spotlights are installed. To control the light devices at the entrance door to the kitchen, a two- or three-key switch is installed.
Checking the installation
After the work is completed, the wiring must be checked before switching on the power supply. Plastering of the walls is only necessary after the full operation of the wiring has been checked.
Do not damage the insulation of routed cables and wires.
When switching on electrical appliances and lighting, the circuit breakers must not be activated. A repeated shortened inspection should be done after the walls have been plastered, as the wire can be damaged by a spatula during the work.
The wiring may well be completed on its own, however, the check and connection should still be entrusted to the specialists.


