There is no doubt about the benefits of water procedures, especially at summer cottages in summer heat. The long-awaited summer sometimes cast aside unnecessary doubts and include a full "shower program." Dreaming to build a summer shower at the dacha, emphasize the budgetary version of the finish - polycarbonate and film materials, and at the same time practical practical design of the remote shower.
It is almost impossible to find a dacha without a summer shower. A summer shower for a summer residence, the options, whose arrangement safely replace the lack of water supply and water disposal, are presented in the form of remote and stationary structures.
External shower
Habitual in European countries remote showers are still a wonder in the vastness of domestic dachas.
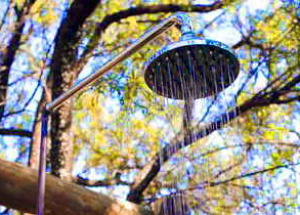
The originality of the design of the remote shower, where a metal tripod or wooden stand is used as a support for a shower rod up to 2.45 m in height, and the surrounding nature serves as an ornamental decoration, it allows you to place showers anywhere in the country.
Simple and quick connection of a remote shower equipped with an adapter and a hose connector, the ability to adjust the razloploskostnoy height of the shower head on the rod makes the use of the remote device comfortable and affordable.
In addition, for a selective summer shower, the selection of cladding materials for purchase excludes the cost side.
But the majority of summer residents prefer the avant-garde European innovations to stationary designs of shower cabins, tightly closed from prying eyes with plastic.
Stationary booths
Today, dacha douche is not a primitive device with a cumbersome upper tank for water. This is a handy summer shower for a heated villa with a matched and assembled frame, lined with wood, polycarbonate sheets or corrugated board.
Naturally, for the device of the summer shower it will be necessary to plan and implement:
- foundation and drainage organization
- fabrication of a skeleton and its shield assembly
- general finish of the shower cubicle
- place the water tank and connect the shower equipment.
Therefore, a step-by-step instruction will facilitate the own-hand process of creating a stationary design, which begins with the design of the shower cubicle.
Helpful Tips
We will propose that the design of the cabin of the summer shower provides the basis for planning the stages of construction: the foundation of the structure, the organization of the drainage and feeding. A simple calculation according to shower drawings guarantees the stability and reliability of the construction of a summer shower of a plastic or wooden structure using a profile pipe.
Especially popular are structures in the form of wooden houses or a summer shower made of polycarbonate. The use of well-known frame-shield technology in their construction protects against wind and rain, without requiring additional thermal insulation.
How to build a summer shower made of wood, shown in the video.
We make a summer shower, step by step
When designing a summer shower, preference is given to a simple rectangular design. Dimensions of the summer shower is recommended to choose, focusing on the size of shower cabins from the manufacturer. For example, on the drawing a showers shower with wooden posts and a concrete foundation of the floor with a shower size of 2200x1800x1200 mm.
The frame base of the shower of wooden bars or metal profiles serve as racks. The height of the racks is preliminarily calculated taking into account the depth during concreting. For reference: for the acquisition of the profile take into account the elevated height, length and width of the shower.
foundation and drainage of water
The depth of foundation of the foundation of a summer shower made of wood or plastic depends on the type of organization of the water flow and can reach 1 m.
Step 1. Roem pits to the required depth.
The bottom of excavated trench is covered with crushed stone 20 cm and we compact it.
The water drain of the water is carried out in the following ways: by equipping the drainage pit or by organizing drainage.
We equip the drainage pit
Step 2. We enclose the walls of the foundation pit with a brick or stone.
Step 3. Create a plastic trumpet from the plastic pipe.
Creating drainage
Step 4. The bottom is filled with layers of sand and gravel with a layer thickness of 15-20 cm, taking into account the recommended final gravel layer.
Step 5. Align the area near the excavation and lay pavers or tiles.
carcass fabrication
The frame of the summer shower is acquired or assembled according to the drawing from the profile pipe, cutting the sidewalls of the frame, the upper stand and welding crossbeams.
Step 6. We measure the landing size for the installation of the water tank.
Step 7. We cut the front posts (2 pcs.) Of the required height from the profile P50x50.
Step 8. We cut the rear posts (2 pcs.) Of the same height from the profile P50x50 and P50.
Step 9. We cut the upper frame (1 pc.) From the profile P50x50.
assembly and installation of the frame
Step 10. We collect vertical frame racks and connect the profiles together. To do this, we use screws with hexagon head 5,5x50 DIN 7504 K.
Step 11. We fix the fasteners to the frame preforms with screws 4,8х19 DIN 7504 K.
Step 12. Form the grooves of profiles fill with waterproof sealant.
Step 13. We install skeleton racks on a concrete screed basement.
Step 14. Verify the vertical installation of the frame.
panel assembly assembly
Step 15. We form the shields for the outer finish of the sidewalls and the roof of the summer shower from the chosen material (plastic, cellular or solid polycarbonate).
Step 16. Fix the sheets (boards) to the frame using self-tapping screws.
The upper shower frame is made of polycarbonate in the form of a "greenhouse".
equipment installation
Installation of the pallet
For the summer shower it is recommended to use a deep steel or acrylic pallet, for which prepare the site.
Step 17. We rammed the pad for the pallet taking into account the dimensions, completely capturing the deep part.
Step 18. At the bottom of the assembled shower frame we install a pallet and ensure its immobility due to the projecting edges.
Container for water
For the supply of water in the shower room, it is preferable to use volumetric tanks of 150-200 liters. dark color
Step 19. The empty container is placed on the upper frame frame.
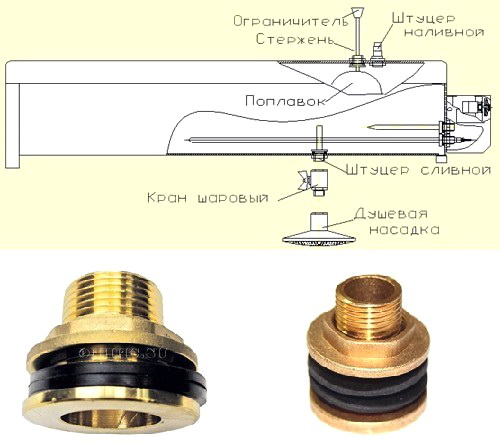
Step 20. Inside the tank, a shower head with a standard connection diameter of 1/2 "is cut.
Step 21. We organize automatic water supply and control of its level.
Helpful Tips
When choosing a water tank, preference should be given to a prefabricated structure equipped with a TEN 2000W, with a hydro level and a water intake, and a thermoregulator and an electric cable of 2.5 m with a plug.
How to personally make a summer shower, shown in the video.


